部分内容摘自:android软件安全权威指南:丰生强
从根源上搞懂基础的原理是很有必要的,这样有助于我们更方便的利用它的特性,达到我们的目的。
我把内容主要分为二个部分。原理探索、案例分析
原理探索 dex文件 我们在正向开发app编译时,编写的java代码,会编译成java字节码保存在.class后缀的文件中。然后再用dx工具将java字节码转换成dex文件(Dalvik字节码)。在转换的过程中,会将所有java字节码中的所有冗余信息组成一个常量池。例如多个class文件中都存在的字符串”hello world”。转换后将单独存放在一个地方,并且所有类共享。包括方法的签名也会组成常量池。我们将编译好的apk文件解压后就能拿到classes.dex文件。
dex文件格式 1、DexFile结构 上面拿到的classes.dex文件包含了apk的可执行代码。Dalvik虚拟机会解析加载文件并执行代码。只要我们了解这个文件格式的组成,那么就可以自己解析这个文件获取到想要的数据。
首先是安卓源码中的dalvik/libdex/DexFile.h这里可以找到dex文件的数据结构。下面贴上源码部分
1
2
3
4
5
6
7
8
9
10
11
12
13
14
15
16
17
18
19
20
21
22
23
24
25
26
27
28
29
30
31
32
struct DexFile { const DexOptHeader* pOptHeader; const DexHeader* pHeader; const DexStringId* pStringIds; const DexTypeId* pTypeIds; const DexFieldId* pFieldIds; const DexMethodId* pMethodIds; const DexProtoId* pProtoIds; const DexClassDef* pClassDefs; const DexLink* pLinkData; const DexClassLookup* pClassLookup; const void * pRegisterMapPool; const u1* baseAddr; int overhead; };
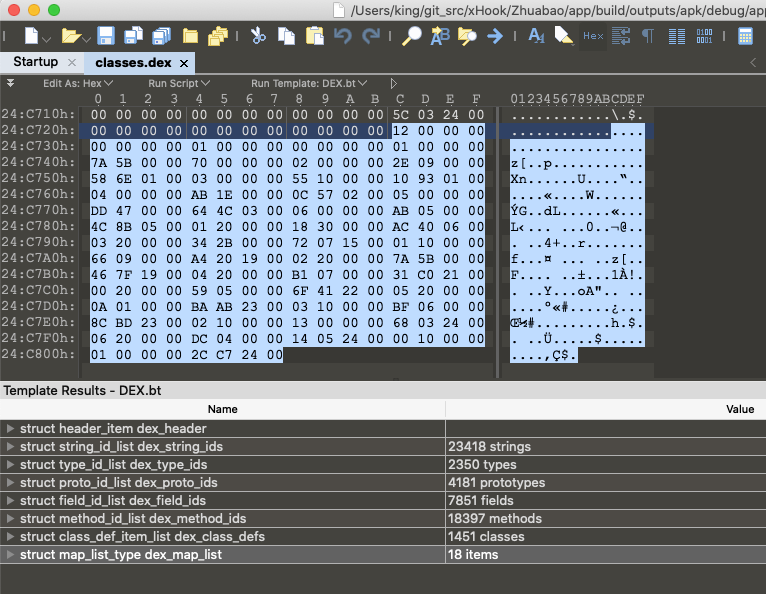
为了更好的理解。dex文件格式,我们可以用010编辑器打开一个dex文件对照这个结构体来观察一下。
可以看到,这个dex文件由这8个部分组成。
dex_header:dex文件头,指定了dex文件的一些数据,记录了其他数据结构在dex文件中的物理偏移
string_ids:字符串列表(前面说的去掉冗余信息组成的常量池,全局共享使用的)
type_ids:类型签名列表(去掉冗余信息组成的常量池)
proto_ids:方法声明列表(去掉冗余信息组成的常量池)
field_ids:字段列表(去掉冗余信息组成的常量池)
method_ids:方法列表(去掉冗余信息组成的常量池)
class_def:类型结构体列表(去掉冗余信息组成的常量池)
map_list:这里记录了前面7个部分的偏移和大小。
然后我们开始逐个的看各个部分的结构。
先是贴上源码看看这个部分的结构体
1
2
3
4
5
6
7
8
9
10
11
12
13
14
15
16
17
18
19
20
21
22
23
24
25
struct DexHeader { u1 magic[8 ]; u4 checksum; u1 signature[kSHA1DigestLen]; u4 fileSize; u4 headerSize; u4 endianTag; u4 linkSize; u4 linkOff; u4 mapOff; u4 stringIdsSize; u4 stringIdsOff; u4 typeIdsSize; u4 typeIdsOff; u4 protoIdsSize; u4 protoIdsOff; u4 fieldIdsSize; u4 fieldIdsOff; u4 methodIdsSize; u4 methodIdsOff; u4 classDefsSize; u4 classDefsOff; u4 dataSize; u4 dataOff; };
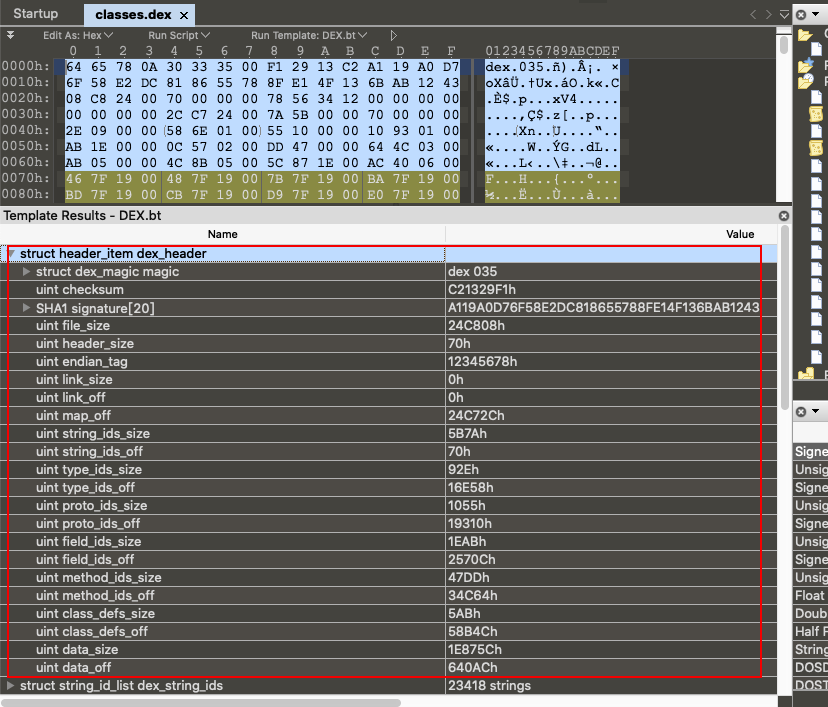
这里可以看到,如果在DexHeader中,可以找到其他部分的偏移和大小,以及整个文件的大小,解析出这块数据,其他部分的任意数据,我们都可以获取到。然后再使用对应的结构体来解析。另外留意这里DexHeader的结构体的大小是固定0x70字节的。所以有的脱壳工具中会将70 00 00 00来作为特征在内存中查找dex进行脱壳(比如FRIDA-DEXDump的深度检索)
然后我们贴一下真实classes.dex文件的DexHeader数据是什么样的。
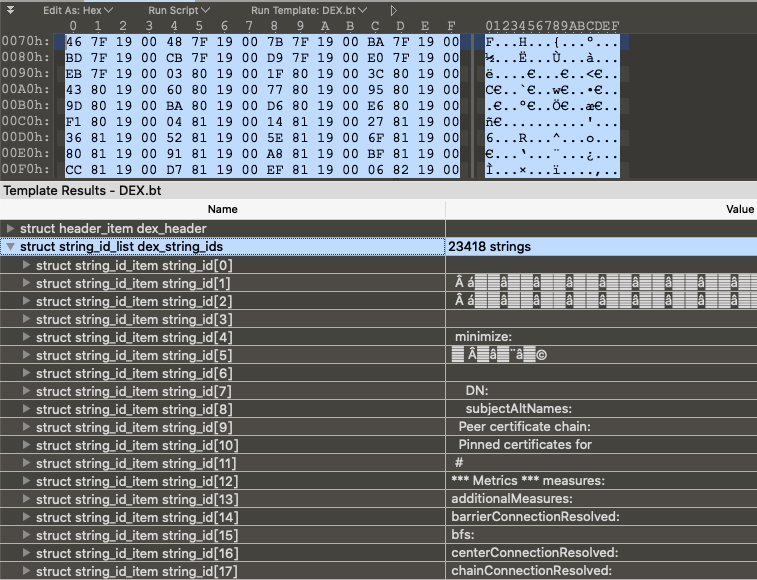
3、string_ids 先看看字符串列表的结构体,非常简单,就是字符串的偏移,但是并不是普通的ascii字符串,而是MUTF-8编码的。这个是一个经过修改的UTF-8编码。和传统的UTF-8相似
1
2
3
struct DexStringId { u4 stringDataOff; };
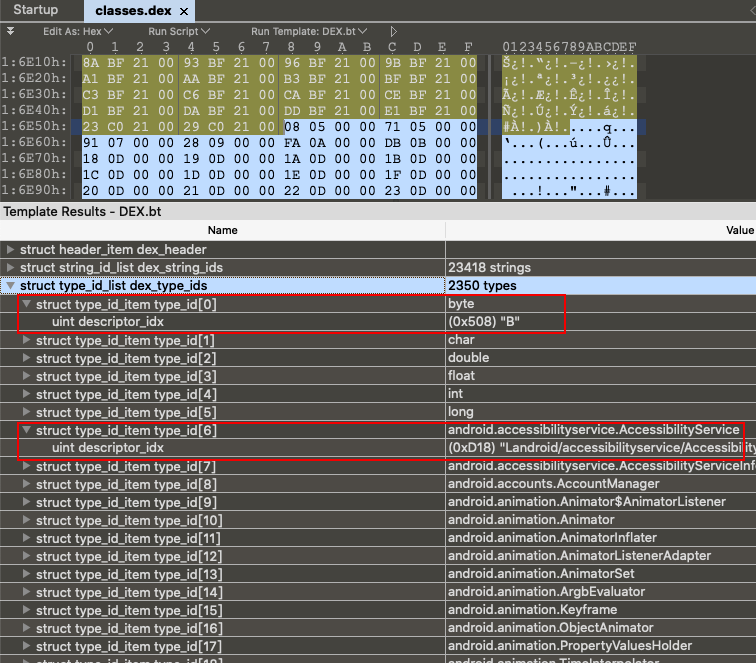
4、type_ids 类型签名列表的结构体也是非常简单,和上面字符串列表差不多
1
2
3
struct DexTypeId { u4 descriptorIdx; };
真实数据图如下,可以看到值类型签名都在前面,后面都是引用类型签名。
5、proto_ids 方法声明的列表的结构体较为复杂,因为方法签名必然是有几点信息构成:返回值类型、参数类型列表(就是每个参数是什么类型)。方法声明的结构体如下
1
2
3
4
5
6
7
8
9
10
11
12
struct DexTypeList { u4 size ; DexTypeItem list [1 ]; }; struct DexTypeItem { u2 typeIdx; }; struct DexProtoId { u4 shortyIdx; u4 returnTypeIdx; u4 parametersOff; };
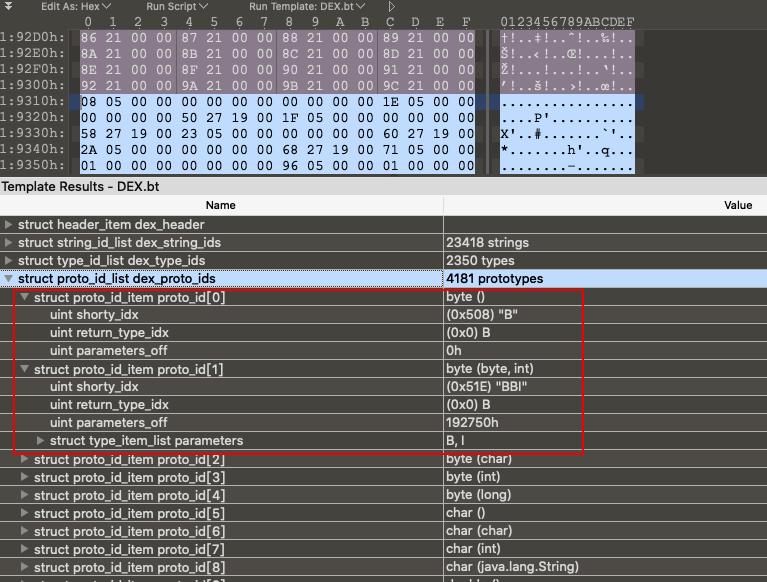
同样看看这个结构的真实数据
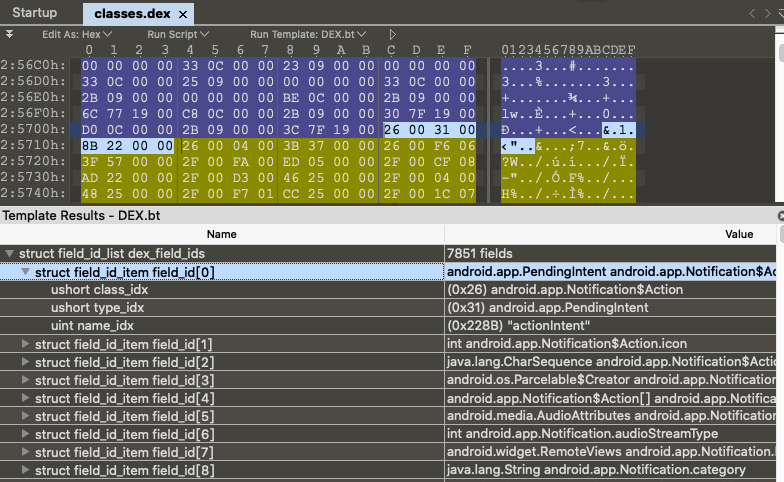
6、field_ids 字段描述的结构体,我们可以先想象一下,要找一个字段,我们需要些什么:字段所属的类,字段的类型,字段名称。有这些信息,就可以找到各自对应的字段了。接下来看看定义的结构体
1
2
3
4
5
struct DexFieldId { u2 classIdx; u2 typeIdx; u4 nameIdx; };
然后看一段真实数据
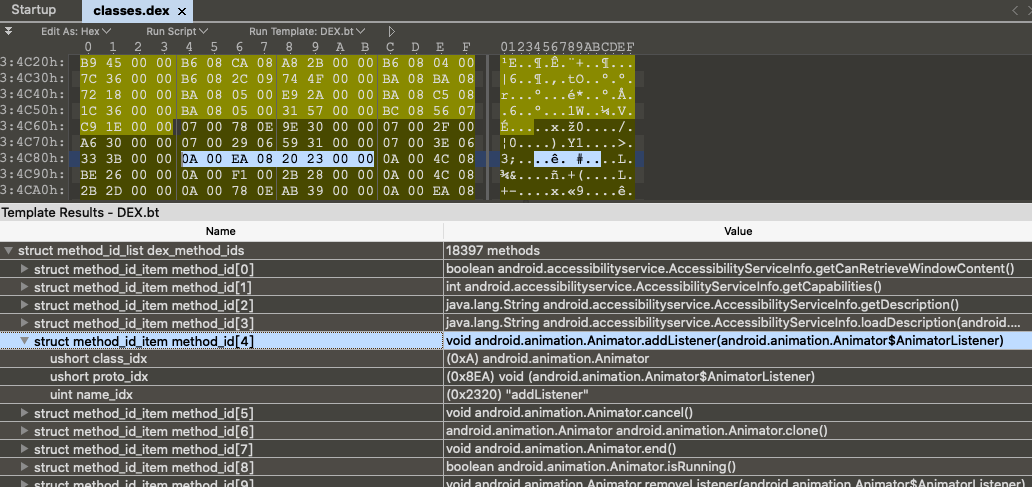
7、method_ids 方法描述的结构体,同样先了解找一个方法的几个必须项:方法所属的类,方法的签名(签名中有方法的返回值和方法的参数,也就是上面的proto_ids中记录的),方法的名称。然后下面看结构体
1
2
3
4
5
struct DexMethodId { u2 classIdx; u2 protoIdx; u4 nameIdx; };
看看一组方法的真实数据
8、class_def 类定义的结构体,这个比较复杂。直接贴上结构体和原文的说明。这里大致可以看出来,和上面的原理差不多,通过这个结构体来描述类的内容。
1
2
3
4
5
6
7
8
9
10
struct DexClassDef { u4 classIdx; u4 accessFlags; u4 superclassIdx; u4 interfacesOff; u4 sourceFileIdx; u4 annotationsOff; u4 classDataOff; u4 staticValuesOff; };
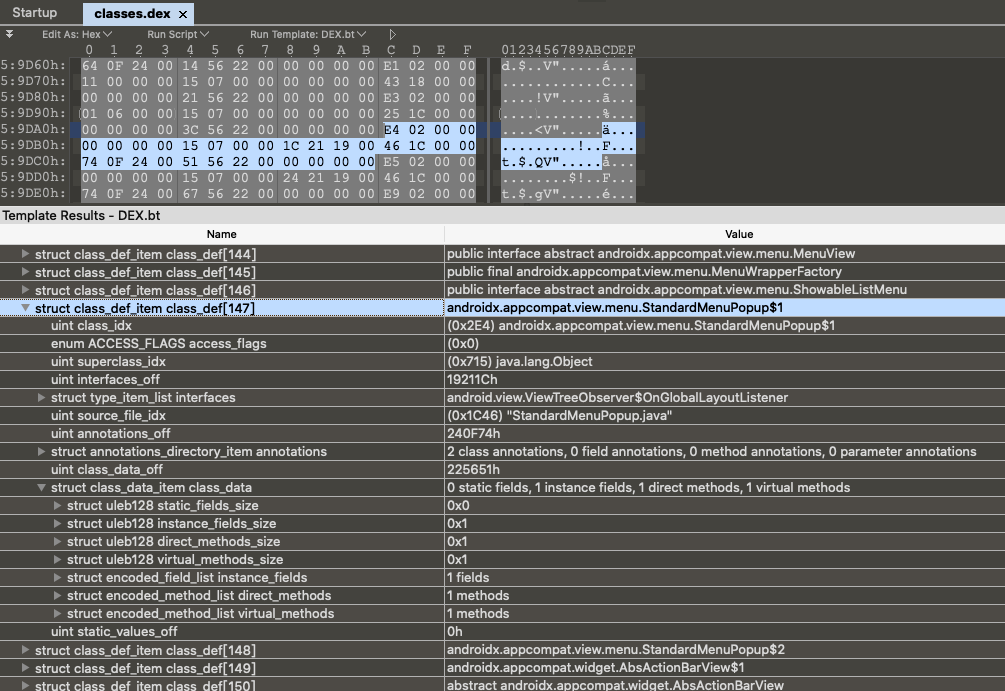
下面同样展示一组真实数据
上面数据看到里面的class_data也是一个结构体,然后继续看这个类数据的结构体
1 2 3 4 5 6 7 8 9 10 11 12 13 14 15 16 17 18 19 20 21 22 23 24 25 26 27 28 struct DexClassDataHeader { u4 staticFieldsSize; u4 instanceFieldsSize; u4 directMethodsSize; u4 virtualMethodsSize; }; struct DexField { u4 fieldIdx; u4 accessFlags; }; struct DexMethod { u4 methodIdx; u4 accessFlags; u4 codeOff; }; struct DexClassData { DexClassDataHeader header; DexField* staticFields; DexField* instanceFields; DexMethod* directMethods; DexMethod* virtualMethods; };
到这里我们基本看到了在开发中,一个类的所有特征。完整的描述出了一个类的所有信息。
9、DexCode上面最后看到方法的代码是通过上面的DexCode结构体来找到的。最后看下这个结构体
1
2
3
4
5
6
7
8
9
10
11
12
13
struct DexCode { u2 registersSize; u2 insSize; u2 outsSize; u2 triesSize; u4 debugInfoOff; u4 insnsSize; u2 insns[1 ]; };
到了这里,存储的就是执行的指令集了。通过执行指令来跑这个方法。下面看一组真实数据
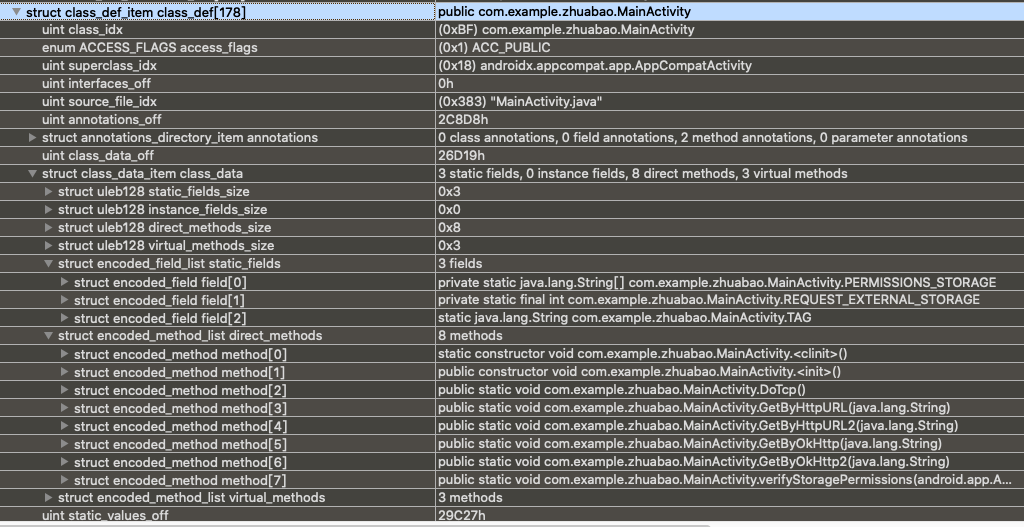
这里看到这个类的具体描述字段和函数,还有访问标志等等信息。然后我们继续看里面函数的执行代码部分。看下面一组数据
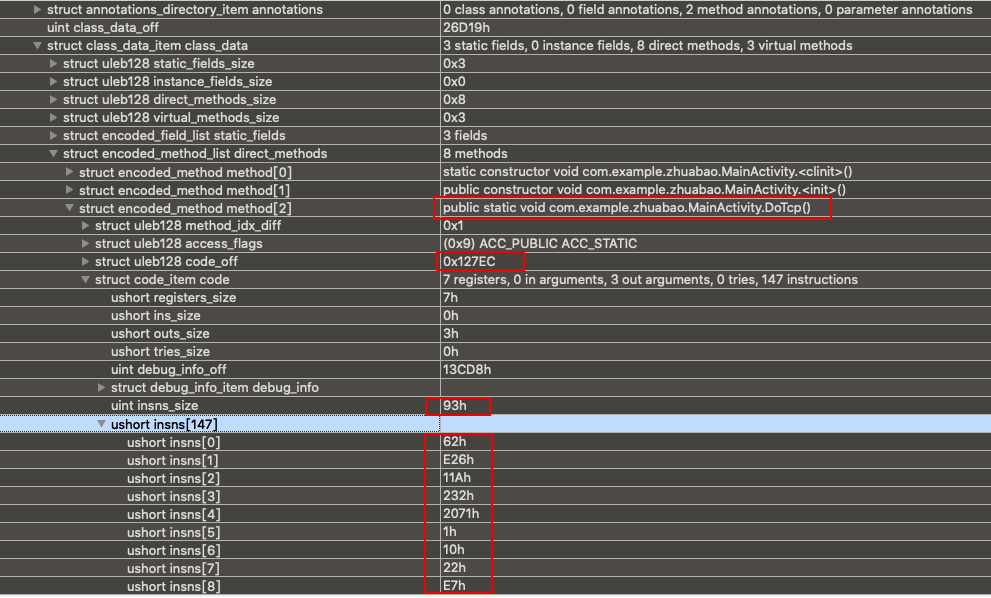
观察的函数是MainActivity类的DoTcp函数。DexCode(也就是code_item,也叫codeOff)的偏移地址是0x127ec。
下面观察到DexCode结构体的偏移到指令集insns字段的偏移是codeOff+2+2+2+2+4+4=0x127fc(这里+的2和4是看下面结构体insns前面的字段占了多少个字节计算的,可以当做固定+16个字节)。指令集的长度是0x93。
最后看看指令集的开始数据是0x62、0xe26、0x11a、0x232。但是我们要注意前面有说明,这里是两字节空间对齐。所以,这里的值我们应该前面填充一下。
前面四个字节我们要看做0x0062、0x0e26、0x011a、0x0232。但是我们还要注意,还有个端序问题会影响字节的顺序,这里是小端序,所以我们再调整下
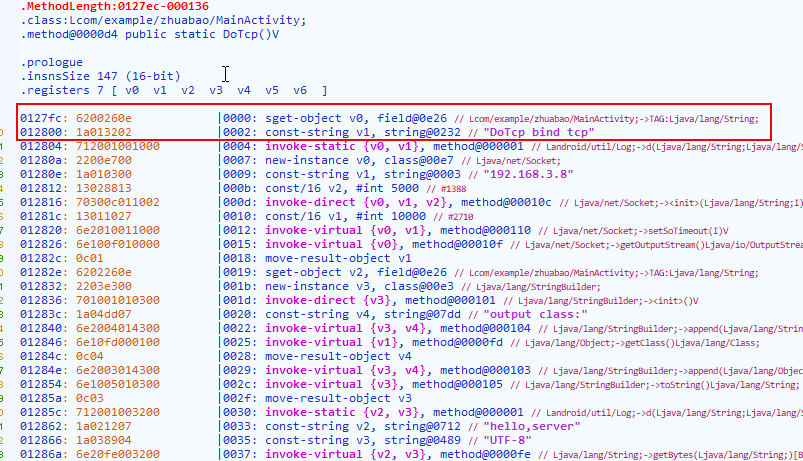
前面四个字节我们要看做0x6200、0x260e、0x1a01、0x3202。把这段指令集的数据看明白后,我们用gda打开这个dex文件。然后找到对应的方法,查看一下。
然后发现数据对上了。这里存储的果然就是我们dex分析方法的字节码了。
9、map_list 在书中的意思是,Dalvik虚拟机解析Dex后,将其映射成DexMapList的数据结构,然后在里面可以找到前面8个部分的偏移和大小。先看看结构体
1
2
3
4
5
6
7
8
9
10
11
12
13
14
15
16
17
18
19
20
21
22
23
24
25
26
27
28
29
30
31
32
33
34
35
36
struct DexMapItem { u2 type; u2 unused; u4 size ; u4 offset; }; struct DexMapList { u4 size ; DexMapItem list [1 ]; }; enum { kDexTypeHeaderItem = 0x0000 , kDexTypeStringIdItem = 0x0001 , kDexTypeTypeIdItem = 0x0002 , kDexTypeProtoIdItem = 0x0003 , kDexTypeFieldIdItem = 0x0004 , kDexTypeMethodIdItem = 0x0005 , kDexTypeClassDefItem = 0x0006 , kDexTypeCallSiteIdItem = 0x0007 , kDexTypeMethodHandleItem = 0x0008 , kDexTypeMapList = 0x1000 , kDexTypeTypeList = 0x1001 , kDexTypeAnnotationSetRefList = 0x1002 , kDexTypeAnnotationSetItem = 0x1003 , kDexTypeClassDataItem = 0x2000 , kDexTypeCodeItem = 0x2001 , kDexTypeStringDataItem = 0x2002 , kDexTypeDebugInfoItem = 0x2003 , kDexTypeAnnotationItem = 0x2004 , kDexTypeEncodedArrayItem = 0x2005 , kDexTypeAnnotationsDirectoryItem = 0x2006 , };
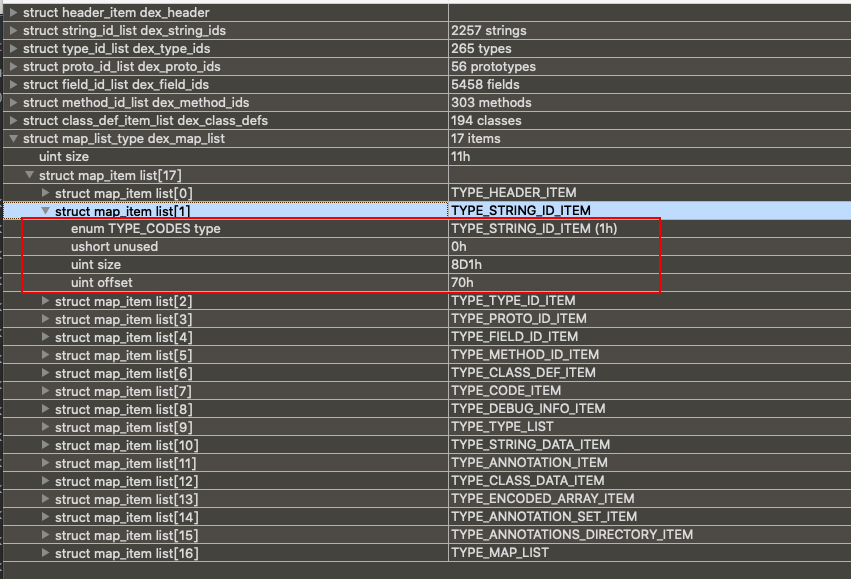
每个DexMapItem对应了一块数据,例如type=kDexTypeHeaderItem则对应DexHeader的偏移地址和大小。下面看真实数据
这里就能看到string_ids的偏移和大小。如此,根据这个map_list就能找到所有块的数据了。
那么在源码中是如何使用这个数据的呢,我好奇的翻了一下。然后再dex文件优化的流程中dexSwapAndVerify函数找到了使用的地方。
1 2 3 4 5 6 7 8 9 10 11 12 13 14 15 16 17 18 19 20 21 22 23 24 25 26 27 28 int dexSwapAndVerify (u1* addr, size_t len) ... if (okay) { if (pHeader->mapOff != 0 ) { DexFile dexFile; DexMapList* pDexMap = (DexMapList*) (addr + pHeader->mapOff); okay = okay && swapMap(&state, pDexMap); okay = okay && swapEverythingButHeaderAndMap(&state, pDexMap); dexFileSetupBasicPointers(&dexFile, addr); state.pDexFile = &dexFile; okay = okay && crossVerifyEverything(&state, pDexMap); } else { ALOGE("ERROR: No map found; impossible to byte-swap and verify" ); okay = false ; } } ... return !okay; }
这个函数中获取了DexMapList。然后交给swapMap函数来处理。
1
2
3
4
5
6
7
8
9
10
11
12
13
14
15
16
17
18
19
20
21
22
23
24
25
26
27
28
29
30
31
32
33
34
35
36
37
38
39
40
41
42
43
44
45
46
47
48
49
50
51
52
53
54
55
56
57
58
59
60
61
62
63
64
65
66
67
68
69
70
71
72
73
74
75
76
77
78
79
80
81
82
83
84
85
86
87
88
89
90
91
92
93
94
95
96
97
98
99
100
101
102
103
104
105
106
107
108
109
110
111
112
113
114
115
116
117
118
119
120
121
122
123
124
125
126
127
128
129
130
131
132
133
134
135
static bool swapMap (CheckState* state, DexMapList* pMap) DexMapItem* item = pMap->list ; u4 count; u4 dataItemCount = 0 ; u4 dataItemsLeft = state->pHeader->dataSize; u4 usedBits = 0 ; bool first = true ; u4 lastOffset = 0 ; SWAP_FIELD4(pMap->size ); count = pMap->size ; const u4 sizeOfItem = (u4) sizeof (DexMapItem); CHECK_LIST_SIZE(item, count, sizeOfItem); while (count--) { SWAP_FIELD2(item->type); SWAP_FIELD2(item->unused); SWAP_FIELD4(item->size ); SWAP_OFFSET4(item->offset); if (first) { first = false ; } else if (lastOffset >= item->offset) { ALOGE("Out-of-order map item: %#x then %#x" , lastOffset, item->offset); return false ; } if (item->offset >= state->pHeader->fileSize) { ALOGE("Map item after end of file: %x, size %#x" , item->offset, state->pHeader->fileSize); return false ; } if (isDataSectionType(item->type)) { u4 icount = item->size ; if (icount > dataItemsLeft) { ALOGE("Unrealistically many items in the data section: " "at least %d" , dataItemCount + icount); return false ; } dataItemsLeft -= icount; dataItemCount += icount; } u4 bit = mapTypeToBitMask(item->type); if (bit == 0 ) { return false ; } if ((usedBits & bit ) != 0 ) { ALOGE("Duplicate map section of type %#x" , item->type); return false ; } if (item->type == kDexTypeCallSiteIdItem) { state->pCallSiteIds = item; } else if (item->type == kDexTypeMethodHandleItem) { state->pMethodHandleItems = item; } usedBits |= bit ; lastOffset = item->offset; item++; } if ((usedBits & mapTypeToBitMask(kDexTypeHeaderItem)) == 0 ) { ALOGE("Map is missing header entry" ); return false ; } if ((usedBits & mapTypeToBitMask(kDexTypeMapList)) == 0 ) { ALOGE("Map is missing map_list entry" ); return false ; } if (((usedBits & mapTypeToBitMask(kDexTypeStringIdItem)) == 0 ) && ((state->pHeader->stringIdsOff != 0 ) || (state->pHeader->stringIdsSize != 0 ))) { ALOGE("Map is missing string_ids entry" ); return false ; } if (((usedBits & mapTypeToBitMask(kDexTypeTypeIdItem)) == 0 ) && ((state->pHeader->typeIdsOff != 0 ) || (state->pHeader->typeIdsSize != 0 ))) { ALOGE("Map is missing type_ids entry" ); return false ; } if (((usedBits & mapTypeToBitMask(kDexTypeProtoIdItem)) == 0 ) && ((state->pHeader->protoIdsOff != 0 ) || (state->pHeader->protoIdsSize != 0 ))) { ALOGE("Map is missing proto_ids entry" ); return false ; } if (((usedBits & mapTypeToBitMask(kDexTypeFieldIdItem)) == 0 ) && ((state->pHeader->fieldIdsOff != 0 ) || (state->pHeader->fieldIdsSize != 0 ))) { ALOGE("Map is missing field_ids entry" ); return false ; } if (((usedBits & mapTypeToBitMask(kDexTypeMethodIdItem)) == 0 ) && ((state->pHeader->methodIdsOff != 0 ) || (state->pHeader->methodIdsSize != 0 ))) { ALOGE("Map is missing method_ids entry" ); return false ; } if (((usedBits & mapTypeToBitMask(kDexTypeClassDefItem)) == 0 ) && ((state->pHeader->classDefsOff != 0 ) || (state->pHeader->classDefsSize != 0 ))) { ALOGE("Map is missing class_defs entry" ); return false ; } state->pDataMap = dexDataMapAlloc(dataItemCount); if (state->pDataMap == NULL ) { ALOGE("Unable to allocate data map (size %#x)" , dataItemCount); return false ; } return true ; }
通过这里的例子。我们可以看到他是如何使用这个map_list来访问所有的部分的。到这里dex文件的格式基本差不多了。
然后我们看看一个实战的项目。大佬写的fart中的py部分就的运用了dex文件格式相关的知识。
案例分析 案例一:fart 1、github
FART
2、功能说明 这是一个脱壳工具,使用主动调用的方式来解决二代抽取壳。脱出来的数据不止是dex。还有一种.bin的数据,这种数据可以用来辅助我们修复dex的一些没有脱出来的函数。我们先看下.bin数据是什么,下面是.bin中的一组数据
1 {name:ooxx,method_idx:1830,offset:180516,code_item_len:24,ins:AQABAAEAAAB+oAMABAAAAHAQwAsAAA4A};
name:是随意填的,因为并不是使用name来找对应函数,而是通过method_idx
method_idx:函数的索引。
offset:函数的偏移
code_item_len:code_item的大小
ins:code_item结构体这段数据的base64编码
另外贴一下这几个数据的dump来源的代码,以防有人把ins当成指令集了。
1
2
3
4
var base64ptr = funcBase64_encode(ptr(codeitemstartaddr), codeitemlength, ptr(base64lengthptr));var b64content = ptr(base64ptr).readCString(base64lengthptr.readInt());funcFreeptr(ptr(base64ptr)); var content = "{name:ooxx,method_idx:" + dex_method_index_ + ",offset:" + dex_code_item_offset_ + ",code_item_len:" + codeitemlength + ",ins:" + b64content + "};" ;
这几个数据是一个函数最关键的片段。拿到就可以还原出最关键的code_item了。
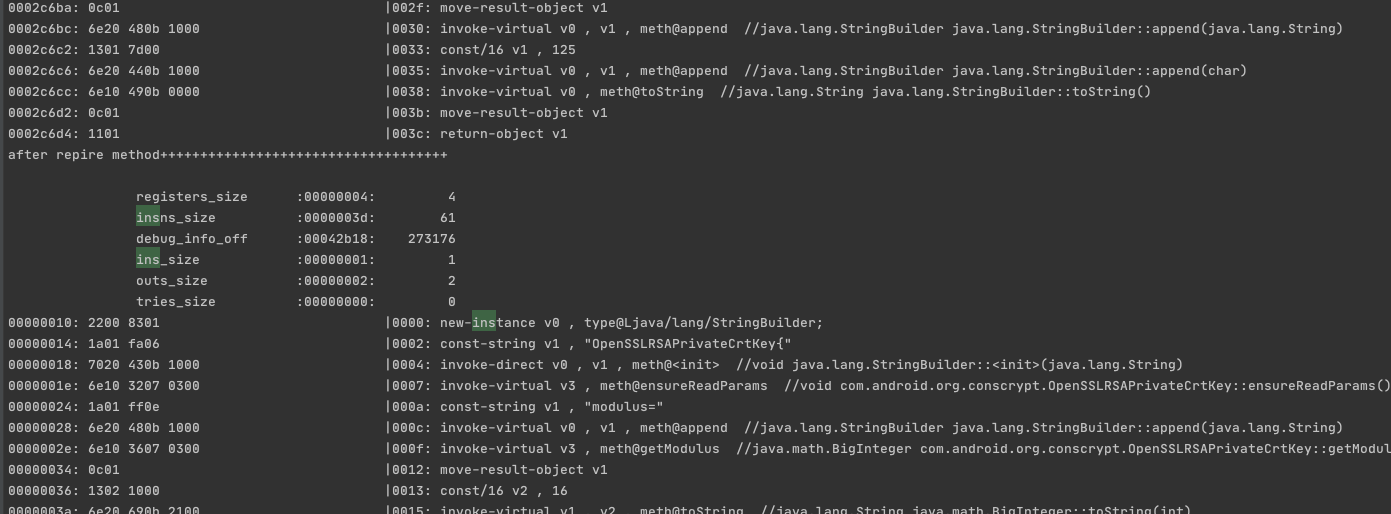
3、使用 然后看看fart.py的使用./fart.py -d 431528_29868.dex -i 431528_29868.bin。下面是执行结果,基本对这个dex进行完整的解析,打印出来大多数的数据。
4、源码分析 我们可以通过对这个项目的阅读,直观的了解到是如何进行dex文件格式进行解析的。下面开始看看具体的实现流程
1
2
3
4
5
6
7
8
9
10
11
12
def main (): dex = dex_parser(filename) if __name__ == "__main__" : init() methodTable.clear() parseinsfile() print "methodTable length:" + str(len(methodTable)) main()
然后看看是如何加载.bin文件的
1
2
3
4
5
6
7
8
9
10
11
12
13
14
15
16
17
18
19
20
21
22
def parseinsfile (): global insfilename insfile=open(insfilename) content=insfile.read() insfile.close() insarray=re.findall(r"{name:(.*?),method_idx:(.*?),offset:(.*?),code_item_len:(.*?),ins:(.*?)}" ,content) for eachins in insarray: methodname=eachins[0 ].replace(" " ,"" ) number=(int)(eachins[1 ]) offset=(int)(eachins[2 ]) inssize=int(eachins[3 ]) ins=eachins[4 ] tempmethod=CodeItem(number,methodname,inssize,ins) methodTable[number]=tempmethod
可以看到就是遍历,组装好那些数据,最后保存到一个methodTable里面,索引就是method_id。
再看看最关键的dex_parse
1
2
3
4
5
6
7
8
9
10
11
12
13
14
15
16
17
18
19
20
21
22
23
24
25
26
27
28
29
30
31
32
33
34
35
36
37
38
39
40
41
42
43
44
45
46
47
48
49
50
51
52
class dex_parser : def __init__ (self,filename ): global DEX_MAGIC global DEX_OPT_MAGIC self.m_javaobject_id = 0 self.m_filename = filename self.m_fd = open(filename,"rb" ) self.m_content = self.m_fd.read() self.m_fd.close() self.m_dex_optheader = None self.m_class_name_id = {} self.string_table = [] if self.m_content[0 :4 ] == DEX_OPT_MAGIC: self.init_optheader(self.m_content) self.init_header(self.m_content,0x40 ) elif self.m_content[0 :4 ] == DEX_MAGIC: self.init_header(self.m_content,0 ) bOffset = self.m_stringIdsOff if self.m_stringIdsSize > 0 : for i in xrange(0 ,self.m_stringIdsSize): offset, = struct.unpack_from("I" ,self.m_content,bOffset + i * 4 ) if i == 0 : start = offset else : skip, length = get_uleb128(self.m_content[start:start+5 ]) self.string_table.append(self.m_content[start+skip:offset-1 ]) start = offset for i in xrange(start,len(self.m_content)): if self.m_content[i]==chr(0 ): self.string_table.append(self.m_content[start+1 :i]) break for i in xrange(0 ,self.m_classDefSize): str1 = self.getclassname(i) self.m_class_name_id[str1] = i for i in xrange(0 ,self.m_classDefSize): str1 = self.getclassname(i) dex_class(self,i).printf(self) pass
这里看到是通过init_header来解析dex文件中的dexHeader的。我就不贴代码了,整体就是偏移然后取数据。
这里有一点要说的是get_uleb128函数,uleb128在android里面是一个特殊的类型。是一个可变长度的类型。大致意思就是例如第一个字节的最高位,如果是1,则第二个字节也是有效数据,如果第二个字节的最高位也是1,下一个字节也是有效数据,如果最高位不是1,就结束了。最后左移拼接就ok了。
这个类型有没有很眼熟?没错,特别像是protobuf里面的varint编码。所以我觉得完全可以用protobuf包自带的varint解码来获取这个数据。也可以用这种自己写的函数来处理。
1
2
3
4
5
6
7
8
9
10
11
12
13
14
15
16
17
18
19
20
21
22
23
24
25
def varint_encode (number ): buf = b'' while True : towrite = number & 0x7f number >>= 7 if number: buf += struct.pack("B" ,(towrite | 0x80 )) else : buf += struct.pack("B" ,towrite) break return buf def varint_decode (buff ): shift = 0 result = 0 idx=0 while True : if idx>len(buff): return "" i = buff[idx] idx+=1 result |= (i & 0x7f ) << shift shift += 7 if not (i & 0x80 ): break return result
继续看后面的关键函数dex_class,这里来处理每一个类的打印
先看看初始化函数,基本和之前的initHeader的差不多,就是偏移取数据,然后保存下来。把classDef相关的数据都读取出来了。
1
2
3
4
5
6
7
8
9
10
11
12
13
14
15
16
17
18
19
20
21
22
23
24
25
26
27
28
29
30
31
32
33
34
35
36
37
38
39
40
41
class dex_class : def __init__ (self,dex_object,classid ): if classid >= dex_object.m_classDefSize: return "" offset = dex_object.m_classDefOffset + classid * struct.calcsize("8I" ) self.offset = offset format = "I" self.thisClass,=struct.unpack_from(format,dex_object.m_content,offset) offset += struct.calcsize(format) self.modifiers,=struct.unpack_from(format,dex_object.m_content,offset) offset += struct.calcsize(format) self.superClass,=struct.unpack_from(format,dex_object.m_content,offset) offset += struct.calcsize(format) self.interfacesOff,=struct.unpack_from(format,dex_object.m_content,offset) offset += struct.calcsize(format) self.sourceFileIdx,=struct.unpack_from(format,dex_object.m_content,offset) offset += struct.calcsize(format) self.annotationsOff,=struct.unpack_from(format,dex_object.m_content,offset) offset += struct.calcsize(format) self.classDataOff,=struct.unpack_from(format,dex_object.m_content,offset) offset += struct.calcsize(format) self.staticValuesOff,=struct.unpack_from(format,dex_object.m_content,offset) offset += struct.calcsize(format) self.index = classid self.interfacesSize = 0 if self.interfacesOff != 0 : self.interfacesSize, = struct.unpack_from("I" ,dex_object.m_content,self.interfacesOff) if self.classDataOff != 0 : offset = self.classDataOff count,self.numStaticFields = get_uleb128(dex_object.m_content[offset:]) offset += count count,self.numInstanceFields = get_uleb128(dex_object.m_content[offset:]) offset += count count,self.numDirectMethods = get_uleb128(dex_object.m_content[offset:]) offset += count count,self.numVirtualMethods = get_uleb128(dex_object.m_content[offset:]) else : self.numStaticFields = 0 self.numInstanceFields = 0 self.numDirectMethods = 0 self.numVirtualMethods = 0
最后就是print函数,这里比较大,就只挑最关键的部分出来说下
1
2
3
4
5
6
7
8
9
10
11
12
13
14
15
16
17
18
19
20
21
22
23
24
25
26
27
28
29
30
31
32
33
34
35
36
37
38
39
def printf (self,dex_object ): ... print "=========numDirectMethods[%d]=numVirtualMethods[%d]=numStaticMethods[0]=========" %(self.numDirectMethods,self.numVirtualMethods) method_idx = 0 for i in xrange(0 ,self.numDirectMethods): n,method_idx_diff = get_uleb128(dex_object.m_content[offset:offset+5 ]) offset += n n,access_flags = get_uleb128(dex_object.m_content[offset:offset+5 ]) offset += n n,code_off = get_uleb128(dex_object.m_content[offset:offset+5 ]) offset += n method_idx += method_idx_diff if code_off != 0 : methodname=dex_object.getmethodfullname(method_idx,True ).replace("::" ,"." ).replace(" " ,"" ) method=None try : method = methodTable[method_idx] except Exception as e: pass if method != None : print "\nDirectMethod:" + dex_object.getmethodfullname(method_idx, True ) + "\n" try : print "before repire method+++++++++++++++++++++++++++++++++++\n" method_code(dex_object, code_off).printf(dex_object, "\t\t" ) except Exception as e: print e try : bytearray_str = base64.b64decode(method.insarray) print "after repire method++++++++++++++++++++++++++++++++++++\n" repired_method_code(dex_object, bytearray_str).printf(dex_object, "\t\t" ) except Exception as e: print e ...
最后我们看下怎么获取的bin文件数据的函数
1
2
3
4
5
6
7
8
9
10
11
12
13
14
15
16
17
18
19
20
21
22
23
24
25
26
27
28
29
30
31
32
33
34
35
36
37
class repired_method_code : dex_obj=None content = "" trylist = [] def __init__ (self, dex_obj,content ): offset=0 format = "H" self.dex_obj=dex_obj self.content=content self.registers_size, = struct.unpack_from(format, content, offset) offset += struct.calcsize(format) self.ins_size, = struct.unpack_from(format, content, offset) offset += struct.calcsize(format) self.outs_size, = struct.unpack_from(format, content, offset) offset += struct.calcsize(format) self.tries_size, = struct.unpack_from(format, content, offset) offset += struct.calcsize(format) format = "I" self.debug_info_off, = struct.unpack_from(format, content, offset) offset += struct.calcsize(format) self.insns_size, = struct.unpack_from(format, content, offset) offset += struct.calcsize(format) self.insns = offset offset += 2 * self.insns_size if self.insns_size % 2 == 1 : offset += 2 if self.tries_size == 0 : self.tries = 0 self.handlers = 0 else : self.handlerlist_offset = offset + 8 * self.tries_size self.tries = offset for i in range(0 , self.tries_size): temptryitem = tryitem(self.dex_obj,content, self.handlerlist_offset, offset + 8 * i) self.trylist.append(temptryitem) self.handlers = offset + self.tries_size * struct.calcsize("I2H" )
最后还有个打印指令集的部分就不贴了。感兴趣的可以自己看一看
案例二:dex2jar 1、github:
dex2jar
2、功能说明 这个工具基本大家都用过。功能非常强大,不过这里只分析下d2j_dex2jar功能。也就是把dex给转换成jar文件。
3、使用 下载release版本直接./d2j-dex2jar.sh classes.dex,就生成出了对应的classes-dex2jar.jar文件。然后我们直接用其他分析工具就能愉快的看java代码了。那么神奇的事情是如何做到的呢。下面跟踪分析一下大佬的作品。
4、源码分析 第一步是找到入口,根据我们上面的使用例子,先搜索下d2j-dex2jar。然后找到了下面的文件
./dex2jar/dex-tools/src/main/java/com/googlecode/dex2jar/tools/Dex2jarCmd.java
先简单的看一下这里的代码,看来这里就是入口函数了。
1
2
3
4
5
6
7
8
@BaseCmd .Syntax(cmd = "d2j-dex2jar" , syntax = "[options] <file0> [file1 ... fileN]" , desc = "convert dex to jar" )public class Dex2jarCmd extends BaseCmd public static void main (String... args) new Dex2jarCmd().doMain(args); } ... }
然后看看doMain的实现
1
2
3
4
5
public void doMain (String... args) ... doCommandLine(); ... }
这里调用了抽象方法,doCommandLine,所以继续看看实现
1
2
3
4
5
6
7
8
9
10
11
12
13
14
15
16
17
18
19
20
21
22
23
24
25
26
27
28
29
30
protected void doCommandLine () throws Exception ... for (String fileName : remainingArgs) { String baseName = getBaseName(new File(fileName).toPath()); Path file = output == null ? currentDir.resolve(baseName + "-dex2jar.jar" ) : output; System.err.println("dex2jar " + fileName + " -> " + file); BaseDexFileReader reader = MultiDexFileReader.open(Files.readAllBytes(new File(fileName).toPath())); BaksmaliBaseDexExceptionHandler handler = notHandleException ? null : new BaksmaliBaseDexExceptionHandler(); Dex2jar.from(reader).withExceptionHandler(handler).reUseReg(reuseReg).topoLogicalSort() .skipDebug(!debugInfo).optimizeSynchronized(this .optmizeSynchronized).printIR(printIR) .noCode(noCode).skipExceptions(skipExceptions).to(file); if (!notHandleException) { if (handler.hasException()) { Path errorFile = exceptionFile == null ? currentDir.resolve(baseName + "-error.zip" ) : exceptionFile; System.err.println("Detail Error Information in File " + errorFile); System.err.println(BaksmaliBaseDexExceptionHandler.REPORT_MESSAGE); handler.dump(errorFile, orginalArgs); } } } }
到这里就可以看出来两个最重要的部分了
1、解析dex的 MultiDexFileReader.open方法
2、执行转换的Dex2jar的to方法
下面先看看解析的处理
1
2
3
4
5
6
7
8
9
10
11
12
13
14
15
16
17
18
19
20
21
22
23
24
25
26
27
28
29
30
31
public static BaseDexFileReader open (byte [] data) throws IOException if (data.length < 3 ) { throw new IOException("File too small to be a dex/zip" ); } if ("dex" .equals(new String(data, 0 , 3 , StandardCharsets.ISO_8859_1))) { return new DexFileReader(data); } else if ("PK" .equals(new String(data, 0 , 2 , StandardCharsets.ISO_8859_1))) { TreeMap<String, DexFileReader> dexFileReaders = new TreeMap<>(); try (ZipFile zipFile = new ZipFile(data)) { for (ZipEntry e : zipFile.entries()) { String entryName = e.getName(); if (entryName.startsWith("classes" ) && entryName.endsWith(".dex" )) { if (!dexFileReaders.containsKey(entryName)) { dexFileReaders.put(entryName, new DexFileReader(toByteArray(zipFile.getInputStream(e)))); } } } } if (dexFileReaders.size() == 0 ) { throw new IOException("Can not find classes.dex in zip file" ); } else if (dexFileReaders.size() == 1 ) { return dexFileReaders.firstEntry().getValue(); } else { return new MultiDexFileReader(dexFileReaders.values()); } } throw new IOException("the src file not a .dex or zip file" ); }
我们直接看参数为dex文件的情况就好了,所以继续看DexFileReader的构造函数
1 2 3 4 5 6 7 8 9 10 11 12 13 14 15 16 17 18 19 20 21 22 23 24 25 26 27 28 29 30 31 32 33 34 35 36 37 38 39 40 41 42 43 44 45 46 47 48 49 50 51 52 53 54 55 56 57 58 59 60 61 62 63 64 65 66 67 68 69 70 71 72 73 74 75 76 77 78 79 80 81 82 83 84 85 86 87 88 89 90 91 92 93 94 95 96 97 98 99 100 101 102 103 104 105 106 107 108 109 110 111 112 113 114 public DexFileReader (byte [] data) this (ByteBuffer.wrap(data)); } public DexFileReader (ByteBuffer in) in.position(0 ); in = in.asReadOnlyBuffer().order(ByteOrder.BIG_ENDIAN); int magic = in.getInt() & 0xFFFFFF00 ; final int MAGIC_DEX = 0x6465780A & 0xFFFFFF00 ; final int MAGIC_ODEX = 0x6465790A & 0xFFFFFF00 ; if (magic == MAGIC_DEX) { ; } else if (magic == MAGIC_ODEX) { throw new DexException("Not support odex" ); } else { throw new DexException("not support magic." ); } int version = in.getInt() >> 8 ; if (version < 0 || version < DEX_035) { throw new DexException("not support version." ); } this .dex_version = version; in.order(ByteOrder.LITTLE_ENDIAN); skip(in, 4 + 20 + 4 + 4 ); int endian_tag = in.getInt(); if (endian_tag != ENDIAN_CONSTANT) { throw new DexException("not support endian_tag" ); } skip(in, 4 + 4 ); int map_off = in.getInt(); string_ids_size = in.getInt(); int string_ids_off = in.getInt(); type_ids_size = in.getInt(); int type_ids_off = in.getInt(); proto_ids_size = in.getInt(); int proto_ids_off = in.getInt(); field_ids_size = in.getInt(); int field_ids_off = in.getInt(); method_ids_size = in.getInt(); int method_ids_off = in.getInt(); class_defs_size = in.getInt(); int class_defs_off = in.getInt(); int call_site_ids_off = 0 ; int call_site_ids_size = 0 ; int method_handle_ids_off = 0 ; int method_handle_ids_size = 0 ; if (dex_version > DEX_037) { in.position(map_off); int size = in.getInt(); for (int i = 0 ; i < size; i++) { int type = in.getShort() & 0xFFFF ; in.getShort(); int item_size = in.getInt(); int item_offset = in.getInt(); switch (type) { case TYPE_CALL_SITE_ID_ITEM: call_site_ids_off = item_offset; call_site_ids_size = item_size; break ; case TYPE_METHOD_HANDLE_ITEM: method_handle_ids_off = item_offset; method_handle_ids_size = item_size; break ; default : break ; } } } this .call_site_ids_size = call_site_ids_size; this .method_handle_ids_size = method_handle_ids_size; stringIdIn = slice(in, string_ids_off, string_ids_size * 4 ); typeIdIn = slice(in, type_ids_off, type_ids_size * 4 ); protoIdIn = slice(in, proto_ids_off, proto_ids_size * 12 ); fieldIdIn = slice(in, field_ids_off, field_ids_size * 8 ); methoIdIn = slice(in, method_ids_off, method_ids_size * 8 ); classDefIn = slice(in, class_defs_off, class_defs_size * 32 ); callSiteIdIn = slice(in, call_site_ids_off, call_site_ids_size * 4 ); methodHandleIdIn = slice(in, method_handle_ids_off, method_handle_ids_size * 8 ); in.position(0 ); annotationsDirectoryItemIn = in.duplicate().order(ByteOrder.LITTLE_ENDIAN); annotationSetItemIn = in.duplicate().order(ByteOrder.LITTLE_ENDIAN); annotationItemIn = in.duplicate().order(ByteOrder.LITTLE_ENDIAN); annotationSetRefListIn = in.duplicate().order(ByteOrder.LITTLE_ENDIAN); classDataIn = in.duplicate().order(ByteOrder.LITTLE_ENDIAN); codeItemIn = in.duplicate().order(ByteOrder.LITTLE_ENDIAN); stringDataIn = in.duplicate().order(ByteOrder.LITTLE_ENDIAN); encodedArrayItemIn = in.duplicate().order(ByteOrder.LITTLE_ENDIAN); typeListIn = in.duplicate().order(ByteOrder.LITTLE_ENDIAN); debugInfoIn = in.duplicate().order(ByteOrder.LITTLE_ENDIAN); }
上面看了dexHeader的解析的核心部分,接下来我们看看转换实现to方法
1
2
3
4
5
6
7
8
9
public void to (Path file) throws IOException if (Files.exists(file) && Files.isDirectory(file)) { doTranslate(file); } else { try (FileSystem fs = createZip(file)) { doTranslate(fs.getPath("/" )); } } }
继续看看doTranslate方法
1
2
3
4
5
6
7
8
9
10
11
12
private void doTranslate (final Path dist) throws IOException ... DexFileNode fileNode = new DexFileNode(); try { reader.accept(fileNode, readerConfig | DexFileReader.IGNORE_READ_EXCEPTION); } catch (Exception ex) { exceptionHandler.handleFileException(ex); } ... }
我们主要观察的是dex的结构和解析,所以就不详细看转换部分了,继续看解析部分的后续accept方法
1 2 3 4 5 6 7 8 9 10 11 12 13 14 15 16 17 18 19 20 21 22 23 24 25 26 27 28 29 30 31 32 33 34 35 36 37 38 39 40 41 42 43 44 45 public void accept (DexFileVisitor dv, int config) dv.visitDexFileVersion(this .dex_version); for (int cid = 0 ; cid < class_defs_size; cid++) { accept(dv, cid, config); } dv.visitEnd(); } public void accept (DexFileVisitor dv, int classIdx, int config) classDefIn.position(classIdx * 32 ); int class_idx = classDefIn.getInt(); int access_flags = classDefIn.getInt(); int superclass_idx = classDefIn.getInt(); int interfaces_off = classDefIn.getInt(); int source_file_idx = classDefIn.getInt(); int annotations_off = classDefIn.getInt(); int class_data_off = classDefIn.getInt(); int static_values_off = classDefIn.getInt(); String className = getType(class_idx); if (ignoreClass(className)) return ; String superClassName = getType(superclass_idx); String[] interfaceNames = getTypeList(interfaces_off); try { DexClassVisitor dcv = dv.visit(access_flags, className, superClassName, interfaceNames); if (dcv != null ) { acceptClass(dcv, source_file_idx, annotations_off, class_data_off, static_values_off, config); dcv.visitEnd(); } } catch (Exception ex) { DexException dexException = new DexException(ex, "Error process class: [%d]%s" , class_idx, className); if (0 != (config & IGNORE_READ_EXCEPTION)) { niceExceptionMessage(dexException, 0 ); } else { throw dexException; } } }
这里最关键的就是acceptClass来解析具体的类的内容
1
2
3
4
5
6
7
8
9
10
11
12
13
14
15
16
17
18
19
20
21
22
23
24
25
26
27
28
29
30
31
32
33
34
35
36
37
38
39
40
41
42
43
44
45
46
47
48
49
50
51
52
53
54
55
56
57
58
59
60
61
62
63
64
65
66
67
68
69
70
71
72
73
74
75
76
77
78
79
80
81
82
83
84
85
86
87
88
89
90
91
92
93
94
95
96
97
98
99
100
101
102
103
104
105
106
107
108
109
110
111
112
113
private void acceptClass (DexClassVisitor dcv, int source_file_idx, int annotations_off, int class_data_off, int static_values_off, int config) if ((config & SKIP_DEBUG) == 0 ) { if (source_file_idx != -1 ) { dcv.visitSource(this .getString(source_file_idx)); } } Map<Integer, Integer> fieldAnnotationPositions; Map<Integer, Integer> methodAnnotationPositions; Map<Integer, Integer> paramAnnotationPositions; if ((config & SKIP_ANNOTATION) == 0 ) { fieldAnnotationPositions = new HashMap<Integer, Integer>(); methodAnnotationPositions = new HashMap<Integer, Integer>(); paramAnnotationPositions = new HashMap<Integer, Integer>(); if (annotations_off != 0 ) { annotationsDirectoryItemIn.position(annotations_off); int class_annotations_off = annotationsDirectoryItemIn.getInt(); int field_annotation_size = annotationsDirectoryItemIn.getInt(); int method_annotation_size = annotationsDirectoryItemIn.getInt(); int parameter_annotation_size = annotationsDirectoryItemIn.getInt(); for (int i = 0 ; i < field_annotation_size; i++) { int field_idx = annotationsDirectoryItemIn.getInt(); int field_annotations_offset = annotationsDirectoryItemIn.getInt(); fieldAnnotationPositions.put(field_idx, field_annotations_offset); } for (int i = 0 ; i < method_annotation_size; i++) { int method_idx = annotationsDirectoryItemIn.getInt(); int method_annotation_offset = annotationsDirectoryItemIn.getInt(); methodAnnotationPositions.put(method_idx, method_annotation_offset); } for (int i = 0 ; i < parameter_annotation_size; i++) { int method_idx = annotationsDirectoryItemIn.getInt(); int parameter_annotation_offset = annotationsDirectoryItemIn.getInt(); paramAnnotationPositions.put(method_idx, parameter_annotation_offset); } if (class_annotations_off != 0 ) { try { read_annotation_set_item(class_annotations_off, dcv); } catch (Exception e) { throw new DexException("error on reading Annotation of class " , e); } } } } else { fieldAnnotationPositions = null ; methodAnnotationPositions = null ; paramAnnotationPositions = null ; } if (class_data_off != 0 ) { ByteBuffer in = classDataIn; in.position(class_data_off); int static_fields = (int ) readULeb128i(in); int instance_fields = (int ) readULeb128i(in); int direct_methods = (int ) readULeb128i(in); int virtual_methods = (int ) readULeb128i(in); { int lastIndex = 0 ; { Object[] constant = null ; if ((config & SKIP_FIELD_CONSTANT) == 0 ) { if (static_values_off != 0 ) { constant = read_encoded_array_item(static_values_off); } } for (int i = 0 ; i < static_fields; i++) { Object value = null ; if (constant != null && i < constant.length) { value = constant[i]; } lastIndex = acceptField(in, lastIndex, dcv, fieldAnnotationPositions, value, config); } } lastIndex = 0 ; for (int i = 0 ; i < instance_fields; i++) { lastIndex = acceptField(in, lastIndex, dcv, fieldAnnotationPositions, null , config); } lastIndex = 0 ; boolean firstMethod = true ; for (int i = 0 ; i < direct_methods; i++) { lastIndex = acceptMethod(in, lastIndex, dcv, methodAnnotationPositions, paramAnnotationPositions, config, firstMethod); firstMethod = false ; } lastIndex = 0 ; firstMethod = true ; for (int i = 0 ; i < virtual_methods; i++) { lastIndex = acceptMethod(in, lastIndex, dcv, methodAnnotationPositions, paramAnnotationPositions, config, firstMethod); firstMethod = false ; } } } }
对类数据进行详细解析后,接着是对字段和方法的解析填充。先看看字段的解析处理
1 2 3 4 5 6 7 8 9 10 11 12 13 14 15 16 17 18 19 20 21 22 23 24 25 26 27 28 29 30 31 32 33 34 35 36 private Field getField (int id) fieldIdIn.position(id * 8 ); int owner_idx = 0xFFFF & fieldIdIn.getShort(); int type_idx = 0xFFFF & fieldIdIn.getShort(); int name_idx = fieldIdIn.getInt(); return new Field(getType(owner_idx), getString(name_idx), getType(type_idx)); } private int acceptField (ByteBuffer in, int lastIndex, DexClassVisitor dcv, Map<Integer, Integer> fieldAnnotationPositions, Object value, int config) int diff = (int ) readULeb128i(in); int field_access_flags = (int ) readULeb128i(in); int field_id = lastIndex + diff; Field field = getField(field_id); DexFieldVisitor dfv = dcv.visitField(field_access_flags, field, value); if (dfv != null ) { if ((config & SKIP_ANNOTATION) == 0 ) { Integer annotation_offset = fieldAnnotationPositions.get(field_id); if (annotation_offset != null ) { try { read_annotation_set_item(annotation_offset, dfv); } catch (Exception e) { throw new DexException(e, "while accept annotation in field:%s." , field.toString()); } } } dfv.visitEnd(); } return field_id; }
字段填充完毕,然后看看方法是怎么解析填充的。
1 2 3 4 5 6 7 8 9 10 11 12 13 14 15 16 17 18 19 20 21 22 23 24 25 26 27 28 29 30 31 32 33 34 35 36 37 38 39 40 41 42 43 44 45 46 47 48 49 50 51 52 53 54 55 56 57 58 59 60 61 62 63 64 65 66 67 68 69 70 71 private Method getMethod (int id) methoIdIn.position(id * 8 ); int owner_idx = 0xFFFF & methoIdIn.getShort(); int proto_idx = 0xFFFF & methoIdIn.getShort(); int name_idx = methoIdIn.getInt(); return new Method(getType(owner_idx), getString(name_idx), getProto(proto_idx)); } private int acceptMethod (ByteBuffer in, int lastIndex, DexClassVisitor cv, Map<Integer, Integer> methodAnnos, Map<Integer, Integer> parameterAnnos, int config, boolean firstMethod) int offset = in.position(); int diff = (int ) readULeb128i(in); int method_access_flags = (int ) readULeb128i(in); int code_off = (int ) readULeb128i(in); int method_id = lastIndex + diff; Method method = getMethod(method_id); ... try { DexMethodVisitor dmv = cv.visitMethod(method_access_flags, method); if (dmv != null ) { if ((config & SKIP_ANNOTATION) == 0 ) { Integer annotation_offset = methodAnnos.get(method_id); if (annotation_offset != null ) { try { read_annotation_set_item(annotation_offset, dmv); } catch (Exception e) { throw new DexException(e, "while accept annotation in method:%s." , method.toString()); } } Integer parameter_annotation_offset = parameterAnnos.get(method_id); if (parameter_annotation_offset != null ) { try { read_annotation_set_ref_list(parameter_annotation_offset, dmv); } catch (Exception e) { throw new DexException(e, "while accept parameter annotation in method:%s." , method.toString()); } } } if (code_off != 0 ) { boolean keep = true ; if (0 != (SKIP_CODE & config)) { keep = 0 != (KEEP_CLINIT & config) && method.getName().equals("<clinit>" ); } if (keep) { DexCodeVisitor dcv = dmv.visitCode(); if (dcv != null ) { try { acceptCode(code_off, dcv, config, (method_access_flags & DexConstants.ACC_STATIC) != 0 , method); } catch (Exception e) { throw new DexException(e, "while accept code in method:[%s] @%08x" , method.toString(), code_off); } } } } dmv.visitEnd(); } } catch (Exception e) { throw new DexException(e, "while accept method:[%s]" , method.toString()); } return method_id; }
继续看code_item的解析
1 2 3 4 5 6 7 8 9 10 11 12 13 14 15 16 17 18 19 20 21 22 23 24 25 26 27 28 29 30 31 32 33 34 35 36 37 38 39 40 41 42 void acceptCode (int code_off, DexCodeVisitor dcv, int config, boolean isStatic, Method method) ByteBuffer in = codeItemIn; in.position(code_off); int registers_size = 0xFFFF & in.getShort(); in.getShort(); in.getShort(); int tries_size = 0xFFFF & in.getShort(); int debug_info_off = in.getInt(); int insns = in.getInt(); byte [] insnsArray = new byte [insns * 2 ]; in.get(insnsArray); dcv.visitRegister(registers_size); BitSet nextInsn = new BitSet(); Map<Integer, DexLabel> labelsMap = new TreeMap<Integer, DexLabel>(); Set<Integer> handlers = new HashSet<Integer>(); if (tries_size > 0 ) { if ((insns & 0x01 ) != 0 ) { in.getShort(); } if (0 == (config & SKIP_EXCEPTION)) { findTryCatch(in, dcv, tries_size, insns, labelsMap, handlers); } } if (debug_info_off != 0 && (0 == (config & SKIP_DEBUG))) { DexDebugVisitor ddv = dcv.visitDebug(); if (ddv != null ) { read_debug_info(debug_info_off, registers_size, isStatic, method, labelsMap, ddv); ddv.visitEnd(); } } BitSet badOps = new BitSet(); findLabels(insnsArray, nextInsn, badOps, labelsMap, handlers, method); acceptInsn(insnsArray, dcv, nextInsn, badOps, labelsMap); dcv.visitEnd(); }
最后的acceptInsn指令集的解析方法太大了,我就不放上来了。整个解析填充的流程就完成了。后面就使用解析好的数据进行转换的操作。
可以看到两个案例的解析的方式差不多,总体都是根据结构体的大小偏移来取得想要的数据。最后一层一层的处理。
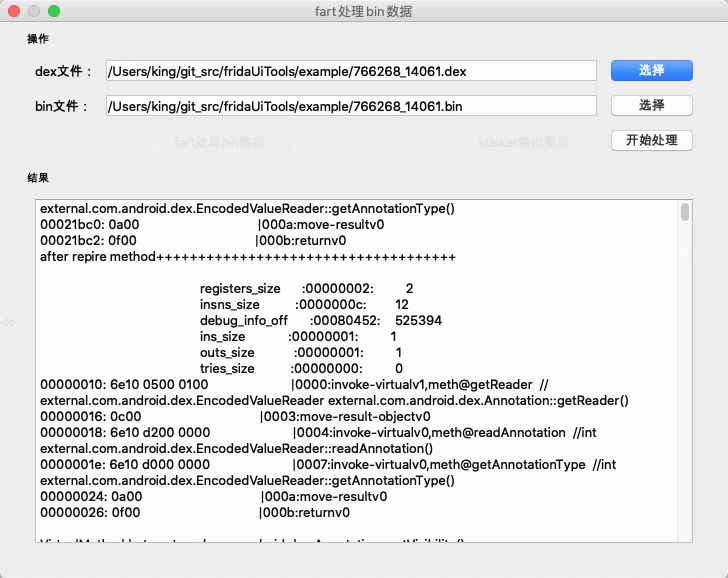
为了方便使用和测试,我将fart的解析整理了一下,改到了python3运行的。然后整合到了我的整合怪里面。感兴趣的可以看看。刚跑通,不知道有没啥问题,后面我再慢慢修复把。
github:fridaUiTools
贴上效果图
疑问 fart的修复方案仅仅是打印出了保存的指令数据。如果我们是想要直接转成.class文件或者是jar文件。是否可行呢。
我设想了两种方案来做,但是最后都被自己给否定了。
1、bin文件中的指令数据直接插入到dex文件的对应数据中,最后保存为一个新的文件。但是这样中间插一段数据,会有大量的偏移数据要修改。
2、和dex2jar的模式一样。构造好一个fileNode对象,里面就不存在偏移的问题了。最后把里面的类数据导出成.class文件。
