文章内的fart的源码素材均来自看雪搞研网课。安卓源码为8.1
学习了一段时间fart然后整理一下以便哪天忘记了翻翻
fart是一个art环境下基于主动调用的自动化脱壳方案。在定制的fart环境中,只需要运行需要脱壳的apk即可自动脱壳,将脱壳后的dex文件dump在/sdcard/fart/app包名的目录下,那么这个流程是如何实现的呢。
内部的一些原理作者有发过帖子详细进行过讲解,所以这里先是跟着作者的思想进行一步步的深入。先贴上地址
1、[FART:ART环境下基于主动调用的自动化脱壳方案][https://bbs.pediy.com/thread-252630.htm]
2、[FART正餐前甜点:ART下几个通用简单高效的dump内存中dex方法][https://bbs.pediy.com/thread-254028.htm]
3、[拨云见日:安卓APP脱壳的本质以及如何快速发现ART下的脱壳点][https://bbs.pediy.com/thread-254555.htm]
阅读几篇文章后,我简单整理一下收获
ActivityThread.main()是一个app开始的入口,下面先贴下8.1系统的main的代码
1
2
3
4
5
6
7
8
9
10
11
12
13
14
15
16
17
18
public static void main (String[] args) SamplingProfilerIntegration.start(); CloseGuard.setEnabled(false ); Environment.initForCurrentUser(); EventLogger.setReporter(new ActivityThread.EventLoggingReporter()); Security.addProvider(new AndroidKeyStoreProvider()); File configDir = Environment.getUserConfigDirectory(UserHandle.myUserId()); TrustedCertificateStore.setDefaultUserDirectory(configDir); Process.setArgV0("<pre-initialized>" ); Looper.prepareMainLooper(); ActivityThread thread = new ActivityThread(); thread.attach(false ); if (sMainThreadHandler == null ) { sMainThreadHandler = thread.getHandler(); } Looper.loop(); throw new RuntimeException("Main thread loop unexpectedly exited" ); }
这里看到主要是创建了一个ActivityThread然后调用了attach,然后就是进入了主线程的事件循环,在attach的里面将这个ActivityThread保存在了一个全局的静态变量中。attach代码比较多,我就只截一点点了。
1
2
3
4
5
6
7
private static ActivityThread sCurrentActivityThread;public static ActivityThread currentActivityThread () return sCurrentActivityThread; } private void attach (boolean system) sCurrentActivityThread = this ; }
然后再看看主线程的事件循环做了什么
1
2
3
4
5
6
7
8
9
10
11
12
13
14
15
16
17
18
19
20
21
22
23
24
25
26
27
28
29
30
31
32
public static void loop () Looper me = myLooper(); if (me == null ) { throw new RuntimeException("No Looper; Looper.prepare() wasn't called on this thread." ); } else { MessageQueue queue = me.mQueue; Binder.clearCallingIdentity(); long ident = Binder.clearCallingIdentity(); while (true ) { Message msg = queue.next(); if (msg == null ) { return ; } Printer logging = me.mLogging; if (logging != null ) { logging.println(">>>>> Dispatching to " + msg.target + " " + msg.callback + ": " + msg.what); } msg.target.dispatchMessage(msg); if (logging != null ) { logging.println("<<<<< Finished to " + msg.target + " " + msg.callback); } long newIdent = Binder.clearCallingIdentity(); if (ident != newIdent) { Log.wtf("Looper" , "Thread identity changed from 0x" + Long.toHexString(ident) + " to 0x" + Long.toHexString(newIdent) + " while dispatching to " + msg.target.getClass().getName() + " " + msg.callback + " what=" + msg.what); } msg.recycleUnchecked(); } } }
然后看到消息交给dispatchMessage这个函数进行分发处理继续看看这个函数
1
2
3
4
5
6
7
8
9
10
11
public void dispatchMessage (Message msg) if (msg.callback != null ) { handleCallback(msg); } else { if (this .mCallback != null && this .mCallback.handleMessage(msg)) { return ; } this .handleMessage(msg); } }
到这里。就进入了handleMessage处理消息分发,这里注意。这个地方的handle使用的是ActivityThread内部的H类,看ActivityThread的以下代码
1
2
3
4
final ActivityThread.H mH = new ActivityThread.H();final Handler getHandler () return this .mH; }
所以这里看H类的handleMessage函数,代码太多,这里只贴文章里面所说的bindapplication的处理
1
2
3
4
5
6
case 110 : Trace.traceBegin(64L , "bindApplication" ); ActivityThread.AppBindData data = (ActivityThread.AppBindData)msg.obj; ActivityThread.this .handleBindApplication(data); Trace.traceEnd(64L ); break ;
然后继续看handleBindApplication,我们就可以看到大神所说的重要的点了
1
2
3
4
5
6
7
8
9
10
11
12
13
14
15
16
17
18
19
20
21
22
23
Application app = data.info.makeApplication(data.restrictedBackupMode, (Instrumentation)null ); this .mInitialApplication = app;if (!data.restrictedBackupMode) { List<ProviderInfo> providers = data.providers; if (providers != null ) { this .installContentProviders(app, providers); this .mH.sendEmptyMessageDelayed(132 , 10000L ); } } try { this .mInstrumentation.onCreate(data.instrumentationArgs); } catch (Exception var20) { throw new RuntimeException("Exception thrown in onCreate() of " + data.instrumentationName + ": " + var20.toString(), var20); } try { this .mInstrumentation.callApplicationOnCreate(app); } catch (Exception var26) { if (!this .mInstrumentation.onException(app, var26)) { throw new RuntimeException("Unable to create application " + app.getClass().getName() + ": " + var26.toString(), var26); } }
这里的callApplicationOnCreate就是app的onCreate调用了。再看看前面的makeApplication的代码
1
2
3
ContextImpl appContext = ContextImpl.createAppContext(this .mActivityThread, this ); app = this .mActivityThread.mInstrumentation.newApplication(cl, appClass, appContext); appContext.setOuterContext(app);
这里又调用了newApplication,继续看里面
1
2
3
4
5
public static Application newApplication (Class<?> clazz, Context context) throws InstantiationException, IllegalAccessException, ClassNotFoundException Application app = (Application)clazz.newInstance(); app.attach(context); return app; }
继续再看app的attach
1
2
3
4
final void attach (Context context) this .attachBaseContext(context); this .mLoadedApk = ContextImpl.getImpl(context).mPackageInfo; }
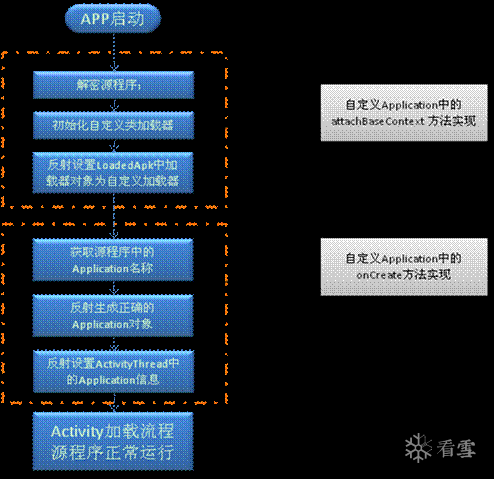
到这里就知道了大家都喜欢的attachBaseContext和onCreate分别是在什么时机调用的了
然后就看下面的图
这里的意思就是加壳的app会在attachBaseContext函数和onCreate函数里面对dex进行解密,解密后再用反射修复里面的变量。最后修复成正常的dex。其中最重要的就是Classloader。所有的应用中加载的dex文件最终都在应用的Classloader中。
所以我们只要取到加壳的应用最后修复完,正常加载时的Classloader就脱壳成功了。这种脱壳方式就是所谓的整体dump。
后来的第二代壳所谓的函数抽取,就是为了防止修复后的dex被直接整体dump给脱下来,然后将类和函数的关键流程在调用时,才进行解密修复。而fart的主动调用所有函数,就会触发解密修复,然后再进行dump,从而实现函数抽取壳的脱壳。
fart脱壳的原理下面贴上作者大佬的原话。
1
2
3
4
FART脱壳的步骤主要分为三步: 1.内存中DexFile结构体完整dex的dump 2.主动调用类中的每一个方法,并实现对应CodeItem的dump 3.通过主动调用dump下来的方法的CodeItem进行dex中被抽取的方法的修复
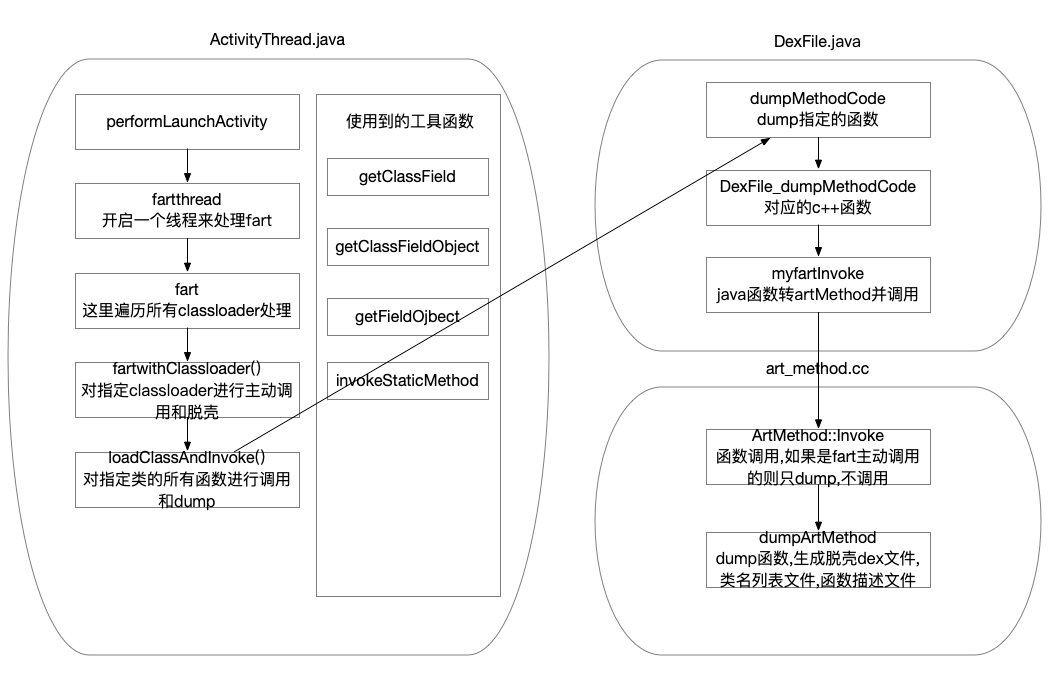
一代壳的脱法,就是选择一个已经完成解密加载的时机,然后把完整的dex给dump下来。由于加壳是通过替换attachBaseContext和onCreate函数,在这两个函数里面解密dex。所以时机选在onCreate后的任意函数都可以。作者大佬选择的是performLaunchActivity作为脱壳的时机。下面贴上关键部分代码
1
2
3
4
5
6
7
8
9
10
11
12
13
14
15
16
17
18
19
20
21
private Activity performLaunchActivity (ActivityClientRecord r, Intent customIntent) fartthread(); } public static void fartthread () new Thread(new Runnable() { @Override public void run () try { Log.e("ActivityThread" , "start sleep......" ); Thread.sleep(1 * 60 * 1000 ); } catch (InterruptedException e) { e.printStackTrace(); } Log.e("ActivityThread" , "sleep over and start fart" ); fart(); Log.e("ActivityThread" , "fart run over" ); } }).start(); }
这里开了一个线程去处理,接着继续看fart做了些啥
1
2
3
4
5
6
7
8
9
10
11
12
13
14
15
16
17
18
19
public static void fart () ClassLoader appClassloader = getClassloader(); ClassLoader tmpClassloader=appClassloader; ClassLoader parentClassloader=appClassloader.getParent(); if (appClassloader.toString().indexOf("java.lang.BootClassLoader" )==-1 ) { fartwithClassloader(appClassloader); } while (parentClassloader!=null ){ if (parentClassloader.toString().indexOf("java.lang.BootClassLoader" )==-1 ) { fartwithClassloader(parentClassloader); } tmpClassloader=parentClassloader; parentClassloader=parentClassloader.getParent(); } }
这里相当于是从当前classloader一直向上层的遍历,把所有classloader挨个脱一遍。先看看他是怎么获取classloader的
1
2
3
4
5
6
7
8
9
10
11
12
13
14
15
16
17
18
19
20
21
public static ClassLoader getClassloader () ClassLoader resultClassloader = null ; Object currentActivityThread = invokeStaticMethod( "android.app.ActivityThread" , "currentActivityThread" , new Class[]{}, new Object[]{}); Object mBoundApplication = getFieldOjbect( "android.app.ActivityThread" , currentActivityThread, "mBoundApplication" ); Application mInitialApplication = (Application) getFieldOjbect("android.app.ActivityThread" , currentActivityThread, "mInitialApplication" ); Object loadedApkInfo = getFieldOjbect( "android.app.ActivityThread$AppBindData" , mBoundApplication, "info" ); Application mApplication = (Application) getFieldOjbect("android.app.LoadedApk" , loadedApkInfo, "mApplication" ); resultClassloader = mApplication.getClassLoader(); return resultClassloader; }
由于我不太了解为什么是获取android.app.LoadedApk里面的mApplication。所以特地的去翻了一下。这个值的来源。
1
2
3
4
5
6
7
8
9
10
11
12
13
14
15
16
17
18
19
20
21
public Application makeApplication (boolean forceDefaultAppClass, Instrumentation instrumentation) if (this .mApplication != null ) { return this .mApplication; } else { Application app = null ; this .mActivityThread.mAllApplications.add(app); this .mApplication = app; return app; } } private Activity performLaunchActivity (ActivityClientRecord r, Intent customIntent) Application app = r.packageInfo.makeApplication(false , mInstrumentation); fartthread(); return activity; }
这样子看,在这个时机的脱壳必然是能取到那个mApplication的。大概就看出这么点原因。
==========================================================================================
里面还有很多地方不太理解。所以这里先从fart中跳出来,先看看android源码中对于获取一个ClassLoader的追溯,看看里面是怎么实现获取一个ClassLoader的。先看看java代码我们要如何获取一个ClassLoader
1
2
ClassLoader cl = ClassLoader.getSystemClassLoader(); cl.loadClass("com.example.demo" );
这里可以看到直接通过loadClass取到的classLoader,那么这个函数是怎么做到的呢,下面贴下代码追踪ClassLoader.java中的loadClass
1
2
3
public Class<?> loadClass(String name) throws ClassNotFoundException { return loadClass(name, false ); }
调用了另外一个重载,继续贴第二个重载的代码
1
2
3
4
5
6
7
8
9
10
11
12
13
14
15
16
17
18
19
20
21
22
23
24
25
protected Class<?> loadClass(String name, boolean resolve) throws ClassNotFoundException { Class<?> c = findLoadedClass(name); if (c == null ) { try { if (parent != null ) { c = parent.loadClass(name, false ); } else { c = findBootstrapClassOrNull(name); } } catch (ClassNotFoundException e) { } if (c == null ) { c = findClass(name); } } return c; }
这里的意思大概就是,如果曾经获取过,findLoadedClass就直接可以获取到并返回。否则就继续通过findClass查找。
1
2
3
protected Class<?> findClass(String name) throws ClassNotFoundException {throw new ClassNotFoundException(name);}
这个是个默认,好像这个是提供给子类重写的。然后我们再看看父类BaseDexClassLoader也有一个findClass
1
2
3
4
5
6
7
8
9
10
11
12
13
14
15
private final DexPathList pathList;@Override protected Class<?> findClass(String name) throws ClassNotFoundException { List<Throwable> suppressedExceptions = new ArrayList<Throwable>(); Class c = pathList.findClass(name, suppressedExceptions); if (c == null ) { ClassNotFoundException cnfe = new ClassNotFoundException( "Didn't find class \"" + name + "\" on path: " + pathList); for (Throwable t : suppressedExceptions) { cnfe.addSuppressed(t); } throw cnfe; } return c; }
这里可以看到最后返回的Class c又是由pathList.findClass获取的。继续看DexPathList类的findClass,后面fart里面有参考这里的代码。在fart中同样是获取dexElements,然后遍历,然后取出dexFile。然后再进行各种操作。
1
2
3
4
5
6
7
8
9
10
11
12
13
14
15
16
17
18
19
20
21
public Class findClass (String name, List<Throwable> suppressed) DexPathList.Element[] arr$ = this .dexElements; int len$ = arr$.length; for (int i$ = 0 ; i$ < len$; ++i$) { DexPathList.Element element = arr$[i$]; DexFile dex = element.dexFile; if (dex != null ) { Class clazz = dex.loadClassBinaryName(name, this .definingContext, suppressed); if (clazz != null ) { return clazz; } } } if (this .dexElementsSuppressedExceptions != null ) { suppressed.addAll(Arrays.asList(this .dexElementsSuppressedExceptions)); } return null ; }
然后继续看返回值的来源是通过loadClassBinaryName来获取的。继续看看实现的代码
1
2
3
public Class loadClassBinaryName (String name, ClassLoader loader, List<Throwable> suppressed) return defineClass(name, loader, this .mCookie, suppressed); }
接着继续看defineClass
1
2
3
4
5
6
7
8
9
10
11
12
13
14
15
16
17
private static Class defineClass (String name, ClassLoader loader, long cookie, List<Throwable> suppressed) Class result = null ; try { result = defineClassNative(name, loader, cookie); } catch (NoClassDefFoundError var7) { if (suppressed != null ) { suppressed.add(var7); } } catch (ClassNotFoundException var8) { if (suppressed != null ) { suppressed.add(var8); } } return result; }
结果又是从defineClassNative来的。而这个函数就是一个native的函数。再翻就得去c++里面找代码了。下面再回到fart的脱壳函数fartwithClassloader,就会发现不少眼熟的地方了
重新回到fart继续看看fartwithClassloader这个函数如何实现脱classloader的
1
2
3
4
5
6
7
8
9
10
11
12
13
14
15
16
17
18
19
20
21
22
23
24
25
26
27
28
29
30
31
32
33
34
35
36
37
38
39
40
41
42
43
44
45
46
47
48
49
50
51
52
53
54
55
56
57
58
59
60
61
62
63
64
65
66
67
68
69
70
71
72
73
74
75
76
77
78
79
80
81
82
83
84
85
86
87
88
89
90
91
92
93
94
95
96
97
98
99
100
101
102
103
104
105
106
107
public static void fartwithClassloader (ClassLoader appClassloader) List<Object> dexFilesArray = new ArrayList<Object>(); Field pathList_Field = (Field) getClassField(appClassloader, "dalvik.system.BaseDexClassLoader" , "pathList" ); Object pathList_object = getFieldOjbect("dalvik.system.BaseDexClassLoader" , appClassloader, "pathList" ); Object[] ElementsArray = (Object[]) getFieldOjbect("dalvik.system.DexPathList" , pathList_object, "dexElements" ); Field dexFile_fileField = null ; try { dexFile_fileField = (Field) getClassField(appClassloader, "dalvik.system.DexPathList$Element" , "dexFile" ); } catch (Exception e) { e.printStackTrace(); } catch (Error e) { e.printStackTrace(); } Class DexFileClazz = null ; try { DexFileClazz = appClassloader.loadClass("dalvik.system.DexFile" ); } catch (Exception e) { e.printStackTrace(); } catch (Error e) { e.printStackTrace(); } Method getClassNameList_method = null ; Method defineClass_method = null ; Method dumpDexFile_method = null ; Method dumpMethodCode_method = null ; for (Method field : DexFileClazz.getDeclaredMethods()) { if (field.getName().equals("getClassNameList" )) { getClassNameList_method = field; getClassNameList_method.setAccessible(true ); } if (field.getName().equals("defineClassNative" )) { defineClass_method = field; defineClass_method.setAccessible(true ); } if (field.getName().equals("dumpDexFile" )) { dumpDexFile_method = field; dumpDexFile_method.setAccessible(true ); } if (field.getName().equals("dumpMethodCode" )) { dumpMethodCode_method = field; dumpMethodCode_method.setAccessible(true ); } } Field mCookiefield = getClassField(appClassloader, "dalvik.system.DexFile" , "mCookie" ); Log.v("ActivityThread->methods" , "dalvik.system.DexPathList.ElementsArray.length:" + ElementsArray.length); for (int j = 0 ; j < ElementsArray.length; j++) { Object element = ElementsArray[j]; Object dexfile = null ; try { dexfile = (Object) dexFile_fileField.get(element); } catch (Exception e) { e.printStackTrace(); } catch (Error e) { e.printStackTrace(); } if (dexfile == null ) { Log.e("ActivityThread" , "dexfile is null" ); continue ; } if (dexfile != null ) { dexFilesArray.add(dexfile); Object mcookie = getClassFieldObject(appClassloader, "dalvik.system.DexFile" , dexfile, "mCookie" ); if (mcookie == null ) { Object mInternalCookie = getClassFieldObject(appClassloader, "dalvik.system.DexFile" , dexfile, "mInternalCookie" ); if (mInternalCookie!=null ) { mcookie=mInternalCookie; }else { Log.v("ActivityThread->err" , "get mInternalCookie is null" ); continue ; } } String[] classnames = null ; try { classnames = (String[]) getClassNameList_method.invoke(dexfile, mcookie); } catch (Exception e) { e.printStackTrace(); continue ; } catch (Error e) { e.printStackTrace(); continue ; } if (classnames != null ) { for (String eachclassname : classnames) { loadClassAndInvoke(appClassloader, eachclassname, dumpMethodCode_method); } } } } return ; }
继续看看fart怎么做到的调用每个类中的所有函数
1
2
3
4
5
6
7
8
9
10
11
12
13
14
15
16
17
18
19
20
21
22
23
24
25
26
27
28
29
30
31
32
33
34
35
36
37
38
39
40
41
42
43
44
45
46
47
48
49
50
51
52
53
54
55
56
57
58
59
60
61
62
63
64
65
public static void loadClassAndInvoke (ClassLoader appClassloader, String eachclassname, Method dumpMethodCode_method) Class resultclass = null ; Log.i("ActivityThread" , "go into loadClassAndInvoke->" + "classname:" + eachclassname); try { resultclass = appClassloader.loadClass(eachclassname); } catch (Exception e) { e.printStackTrace(); return ; } catch (Error e) { e.printStackTrace(); return ; } if (resultclass != null ) { try { Constructor<?> cons[] = resultclass.getDeclaredConstructors(); for (Constructor<?> constructor : cons) { if (dumpMethodCode_method != null ) { try { dumpMethodCode_method.invoke(null , constructor); } catch (Exception e) { e.printStackTrace(); continue ; } catch (Error e) { e.printStackTrace(); continue ; } } else { Log.e("ActivityThread" , "dumpMethodCode_method is null " ); } } } catch (Exception e) { e.printStackTrace(); } catch (Error e) { e.printStackTrace(); } try { Method[] methods = resultclass.getDeclaredMethods(); if (methods != null ) { for (Method m : methods) { if (dumpMethodCode_method != null ) { try { dumpMethodCode_method.invoke(null , m); } catch (Exception e) { e.printStackTrace(); continue ; } catch (Error e) { e.printStackTrace(); continue ; } } else { Log.e("ActivityThread" , "dumpMethodCode_method is null " ); } } } } catch (Exception e) { e.printStackTrace(); } catch (Error e) { e.printStackTrace(); } } }
接下来就看看我们提前准备的dumpMethod是如何dump函数的了。找到DexFile里面的native实现的代码
1
2
3
4
5
6
7
8
9
private static native void dumpMethodCode (Object m) static void DexFile_dumpMethodCode (JNIEnv* env, jclass,jobject method) if (method!=nullptr ) { ArtMethod* proxy_method = jobject2ArtMethod(env, method); myfartInvoke(proxy_method); } return ; }
这里先是把java传递过来的函数指针转换成了ArtMethod了。然后myfartInvoke来处理每个函数。继续看看里面怎么做的
1
2
3
4
5
6
7
8
extern "C" void myfartInvoke (ArtMethod* artmethod) REQUIRES_SHARED (Locks::mutator_lock_) JValue *result=nullptr ; Thread *self=nullptr ; uint32_t temp=6 ; uint32_t * args=&temp; uint32_t args_size=6 ; artmethod->Invoke(self, args, args_size, result, "fart" ); }
看到是调用了artmethod的Invoke。然后最后一个参数来告知里面,这是一个fart主动调用的函数。继续看看里面处理。代码有点多,下,面代码只放上和fart相关的处理
1
2
3
4
5
6
7
void ArtMethod::Invoke (Thread* self, uint32_t * args, uint32_t args_size, JValue* result, const char * shorty) if (self== nullptr ) { dumpArtMethod(this ); return ; } }
这里看到。其实他虽然传了个fart字符串进来想作为判断的。但是实际上没有使用。最后还是根据第一个参数self是否为nullptr来判断用不用dump这个函数的。继续看dumpArtMethod的处理
1
2
3
4
5
6
7
8
9
10
11
12
13
14
15
16
17
18
19
20
21
22
23
24
25
26
27
28
29
30
31
32
33
34
35
36
37
38
39
40
41
42
43
44
45
46
47
48
49
50
51
52
53
54
55
56
57
58
59
60
61
62
63
64
65
66
67
68
69
70
71
72
73
74
75
76
77
78
79
80
81
82
83
84
85
86
87
88
89
90
91
92
93
94
95
96
97
98
99
100
101
102
103
104
105
106
107
108
109
110
111
112
113
114
115
116
117
118
119
120
121
122
123
124
125
126
127
128
129
130
131
132
133
134
135
136
137
138
139
140
141
142
143
144
145
146
147
148
149
150
151
152
153
154
155
156
157
158
159
160
161
162
163
extern "C" void dumpArtMethod (ArtMethod* artmethod) REQUIRES_SHARED (Locks::mutator_lock_) char *dexfilepath=(char *)malloc (sizeof (char )*1000 ); if (dexfilepath==nullptr ) { LOG(ERROR) << "ArtMethod::dumpArtMethodinvoked,methodname:" <<artmethod->PrettyMethod().c_str()<<"malloc 1000 byte failed" ; return ; } int result=0 ; int fcmdline =-1 ; char szCmdline[64 ]= {0 }; char szProcName[256 ] = {0 }; int procid = getpid(); sprintf (szCmdline,"/proc/%d/cmdline" , procid); fcmdline = open (szCmdline, O_RDONLY,0644 ); if (fcmdline >0 ) { result=read (fcmdline, szProcName,256 ); if (result<0 ) { LOG(ERROR) << "ArtMethod::dumpdexfilebyArtMethod,open cmdline file file error" ; } close (fcmdline); } if (szProcName[0 ]) { const DexFile* dex_file = artmethod->GetDexFile(); const uint8_t * begin_=dex_file->Begin(); size_t size_=dex_file->Size(); memset (dexfilepath,0 ,1000 ); int size_int_=(int )size_; memset (dexfilepath,0 ,1000 ); sprintf (dexfilepath,"%s" ,"/sdcard/fart" ); mkdir (dexfilepath,0777 ); memset (dexfilepath,0 ,1000 ); sprintf (dexfilepath,"/sdcard/fart/%s" ,szProcName); mkdir (dexfilepath,0777 ); memset (dexfilepath,0 ,1000 ); sprintf (dexfilepath,"/sdcard/fart/%s/%d_dexfile.dex" ,szProcName,size_int_); int dexfilefp=open (dexfilepath,O_RDONLY,0666 ); if (dexfilefp>0 ){ close (dexfilefp); dexfilefp=0 ; }else { int fp=open (dexfilepath,O_CREAT|O_APPEND|O_RDWR,0666 ); if (fp>0 ) { result=write (fp,(void *)begin_,size_); if (result<0 ) { LOG(ERROR) << "ArtMethod::dumpdexfilebyArtMethod,open dexfilepath file error" ; } fsync(fp); close (fp); memset (dexfilepath,0 ,1000 ); sprintf (dexfilepath,"/sdcard/fart/%s/%d_classlist.txt" ,szProcName,size_int_); int classlistfile=open (dexfilepath,O_CREAT|O_APPEND|O_RDWR,0666 ); if (classlistfile>0 ) { for (size_t ii= 0 ; ii< dex_file->NumClassDefs(); ++ii) { const DexFile::ClassDef& class_def = dex_file->GetClassDef(ii); const char * descriptor = dex_file->GetClassDescriptor(class_def); result=write (classlistfile,(void *)descriptor,strlen (descriptor)); if (result<0 ) { LOG(ERROR) << "ArtMethod::dumpdexfilebyArtMethod,write classlistfile file error" ; } const char * temp="\n" ; result=write (classlistfile,(void *)temp,1 ); if (result<0 ) { LOG(ERROR) << "ArtMethod::dumpdexfilebyArtMethod,write classlistfile file error" ; } } fsync(classlistfile); close (classlistfile); } } } const DexFile::CodeItem* code_item = artmethod->GetCodeItem(); if (LIKELY(code_item != nullptr )) { int code_item_len = 0 ; uint8_t *item=(uint8_t *) code_item; if (code_item->tries_size_>0 ) { const uint8_t *handler_data = (const uint8_t *)(DexFile::GetTryItems(*code_item, code_item->tries_size_)); uint8_t * tail = codeitem_end(&handler_data); code_item_len = (int )(tail - item); }else { code_item_len = 16 +code_item->insns_size_in_code_units_*2 ; } memset (dexfilepath,0 ,1000 ); int size_int=(int )dex_file->Size(); uint32_t method_idx=artmethod->GetDexMethodIndexUnchecked(); sprintf (dexfilepath,"/sdcard/fart/%s/%d_ins_%d.bin" ,szProcName,size_int,(int )gettidv1()); int fp2=open (dexfilepath,O_CREAT|O_APPEND|O_RDWR,0666 ); if (fp2>0 ){ lseek(fp2,0 ,SEEK_END); memset (dexfilepath,0 ,1000 ); int offset=(int )(item - begin_); sprintf (dexfilepath,"{name:%s,method_idx:%d,offset:%d,code_item_len:%d,ins:" ,artmethod->PrettyMethod().c_str(),method_idx,offset,code_item_len); int contentlength=0 ; while (dexfilepath[contentlength]!=0 ) contentlength++; result=write (fp2,(void *)dexfilepath,contentlength); if (result<0 ) { LOG(ERROR) << "ArtMethod::dumpdexfilebyArtMethod,write ins file error" ; } long outlen=0 ; char * base64result=base64_encode((char *)item,(long )code_item_len,&outlen); result=write (fp2,base64result,outlen); if (result<0 ) { LOG(ERROR) << "ArtMethod::dumpdexfilebyArtMethod,write ins file error" ; } result=write (fp2,"};" ,2 ); if (result<0 ) { LOG(ERROR) << "ArtMethod::dumpdexfilebyArtMethod,write ins file error" ; } fsync(fp2); close (fp2); if (base64result!=nullptr ){ free (base64result); base64result=nullptr ; } } } } if (dexfilepath!=nullptr ) { free (dexfilepath); dexfilepath=nullptr ; } }
再贴一个codeitem_end是怎么计算包含try的函数大小
1
2
3
4
5
6
7
8
9
10
11
12
13
14
15
16
17
18
19
uint8_t * codeitem_end (const uint8_t **pData) uint32_t num_of_list = DecodeUnsignedLeb128(pData); for (;num_of_list>0 ;num_of_list--) { int32_t num_of_handlers=DecodeSignedLeb128(pData); int num=num_of_handlers; if (num_of_handlers<=0 ) { num=-num_of_handlers; } for (; num > 0 ; num--) { DecodeUnsignedLeb128(pData); DecodeUnsignedLeb128(pData); } if (num_of_handlers<=0 ) { DecodeUnsignedLeb128(pData); } } return (uint8_t *)(*pData); }
到这里fart的主动调用脱壳流程基本完成。当然还有一些辅助frida的处理函数,下面贴一些大神为了方便我们使用frida来处理而包装的函数
1 2 3 4 5 6 7 8 9 10 11 12 13 14 15 16 17 18 19 20 21 22 23 24 25 26 27 28 29 30 31 32 33 34 35 36 37 38 39 40 41 42 43 44 45 46 47 48 49 50 51 52 53 54 55 56 57 58 59 60 61 62 63 64 65 66 67 68 69 70 71 72 73 74 75 76 77 78 79 80 81 82 83 84 85 86 87 88 89 90 91 92 93 94 95 public static Field getClassField (ClassLoader classloader, String class_name, String filedName) try { Class obj_class = classloader.loadClass(class_name); Field field = obj_class.getDeclaredField(filedName); field.setAccessible(true ); return field; } catch (SecurityException e) { e.printStackTrace(); } catch (NoSuchFieldException e) { e.printStackTrace(); } catch (IllegalArgumentException e) { e.printStackTrace(); } catch (ClassNotFoundException e) { e.printStackTrace(); } return null ; } public static Object getClassFieldObject (ClassLoader classloader, String class_name, Object obj, String filedName) try { Class obj_class = classloader.loadClass(class_name); Field field = obj_class.getDeclaredField(filedName); field.setAccessible(true ); Object result = null ; result = field.get(obj); return result; } catch (SecurityException e) { e.printStackTrace(); } catch (NoSuchFieldException e) { e.printStackTrace(); } catch (IllegalArgumentException e) { e.printStackTrace(); } catch (ClassNotFoundException e) { e.printStackTrace(); } catch (IllegalAccessException e) { e.printStackTrace(); } return null ; } public static Object getFieldOjbect (String class_name, Object obj, String filedName) try { Class obj_class = Class.forName(class_name); Field field = obj_class.getDeclaredField(filedName); field.setAccessible(true ); return field.get(obj); } catch (SecurityException e) { e.printStackTrace(); } catch (NoSuchFieldException e) { e.printStackTrace(); } catch (IllegalArgumentException e) { e.printStackTrace(); } catch (IllegalAccessException e) { e.printStackTrace(); } catch (ClassNotFoundException e) { e.printStackTrace(); } catch (NullPointerException e) { e.printStackTrace(); } return null ; } public static Object invokeStaticMethod (String class_name, String method_name, Class[] pareTyple, Object[] pareVaules) try { Class obj_class = Class.forName(class_name); Method method = obj_class.getMethod(method_name, pareTyple); return method.invoke(null , pareVaules); } catch (SecurityException e) { e.printStackTrace(); } catch (IllegalArgumentException e) { e.printStackTrace(); } catch (IllegalAccessException e) { e.printStackTrace(); } catch (NoSuchMethodException e) { e.printStackTrace(); } catch (InvocationTargetException e) { e.printStackTrace(); } catch (ClassNotFoundException e) { e.printStackTrace(); } return null ; }
最后贴一下简单的流程图。
如果写的有啥问题。希望大佬们能指正。